Game Programming Using Qt 5 Beginner's Guide |
Second Edition |
Create amazing games with Qt 5, C++, and Qt Quick |
Pavel Strakhov |
|
Witold Wysota |
|
Lorenz Haas |
|
BIRMINGHAM - MUMBAI |

Game Programming Using Qt 5 Beginner's Guide Second Edition
Copyright © 2018 Packt Publishing
All rights reserved. No part of this book may be reproduced, stored in a retrieval system, or transmitted in any form or by any means, without the prior written permission of the publisher, except in the case of brief quotations embedded in critical articles or reviews.
Every effort has been made in the preparation of this book to ensure the accuracy of the information presented. However, the information contained in this book is sold without warranty, either express or implied. Neither the authors, nor Packt Publishing or its dealers and distributors, will be held liable for any damages caused or alleged to have been caused directly or indirectly by this book.
Packt Publishing has endeavored to provide trademark information about all of the companies and products mentioned in this book by the appropriate use of capitals. However, Packt Publishing cannot guarantee the accuracy of this information.
Acquisition Editor: Shweta Pant
Content Development Editor: Flavian Vaz
Technical Editor: Akhil Nair
Copy Editor: Shaila Kusanale
Project Coordinator: Devanshi Doshi
Proofreader: Safis Editing
Indexer: Rekha Nair
Graphics: Jason Monteiro
Production Coordinator: Aparna Bhagat
First published: January 2016
Second edition: April 2018
Production reference: 1240418
Published by Packt Publishing Ltd. Livery Place
35 Livery Street Birmingham B3 2PB, UK.
ISBN 978-1-78839-999-9

Mapt is an online digital library that gives you full access to over 5,000 books and videos, as well as industry leading tools to help you plan your personal development and advance your career. For more information, please visit our website.
Why subscribe?
- Spend less time learning and more time coding with practical eBooks and Videos from over 4,000 industry professionals
- Improve your learning with Skill Plans built especially for you
- Get a free eBook or video every month
- Mapt is fully searchable
- Copy and paste, print, and bookmark content
PacktPub.com
Did you know that Packt offers eBook versions of every book published, with PDF and ePub files available? You can upgrade to the eBook version at www.PacktPub.com and as a print book customer, you are entitled to a discount on the eBook copy. Get in touch with us at service@packtpub.com for more details.
At www.PacktPub.com, you can also read a collection of free technical articles, sign up for a range of free newsletters, and receive exclusive discounts and offers on Packt books and eBooks.
About the authors
Pavel Strakhov is a software architect and developer from Russia. He started working with Qt in 2011 in Moscow Institute of Physics and Technology, where it was used to build scientific image processing software. During 2012-2015, he was highly active in the Qt section of StackOverflow, helping people learn Qt and solve issues. In 2016, he started working on Qt bindings for Rust language.
I would like to thank all the reviewers who worked with me on this book for their invaluable feedback. I am also very grateful to all people from Packt Publishing who worked with me. Writing this book wouldn't have been possible without their support and motivation.
Witold Wysota is a software architect and developer living in Poland. He started his adventure with Qt in 2004 and, since then, it has become his main area of expertise.
He is an active trainer and consultant in Qt, C++, and related technologies in both commercial and academic environments.
In real life, he is a passionate adept of Seven Star Praying Mantis, a traditional style of Chinese martial arts.
Lorenz Haas, a passionate programmer, started his Qt career with Qt 3. He immersed himself in this framework, became one of the first certified Qt developers and specialists, and turned his love for Qt into his profession.
Lorenz is now working as a lead software architect. He mainly develops machine controls and their user interfaces as well as general solutions for the industry sector.
Years ago, he started contributing to Qt Creator and Qt. He added a couple of refactoring options that you probably rely on regularly if you use Qt Creator. He is also the author of the Beautifier plugin.
What this book covers
Chapter 1, Introduction to Qt, familiarizes you with the standard behavior that is required when creating cross-platform applications and shows you a bit of history of Qt and how it evolved over time with an emphasis on the most recent architectural changes in Qt.
Chapter 2, Installation, guides you through the process of installing a Qt binary release for desktop platforms, setting up the bundled IDE, and looks at various configuration options related to cross-platform programming.
Chapter 3, Qt GUI Programming, shows you how to create classic user interfaces with the Qt Widgets module. It also familiarizes you with the process of compiling applications using Qt.
Chapter 4, Custom 2D Graphics with Graphics View, familiarizes you with 2D object-oriented graphics in Qt. You will learn how to use built-in items to compose the final results as well as create your own items supplementing what is already available.
Chapter 5, Animations in Graphics View, describes the Qt Animation framework, the property system, and shows you how to implement animations in Graphics View. It will guide you through the process of creating a game featuring 2D graphics and animations.
Chapter 6, Qt Core Essentials, covers the concepts related to data processing and display in Qt-file handling in different formats, Unicode text handling and displaying user-visible strings in different languages, and regular expression matching.
Chapter 7, Networking, demonstrates the IP networking technologies that are available in Qt. It will teach you how to connect to TCP servers, implement a TCP server, and implement fast communication via UDP.
Chapter 8, Custom Widgets, describes the whole mechanism related to 2D software rendering in Qt, and teaches you how to create your own widget classes with unique functionalities.
Chapter 9, OpenGL and Vulkan in Qt applications, discusses Qt capabilities related to accelerated 3D graphics. You will learn how to perform fast 3D drawing using OpenGL and Vulkan APIs and use the convenient wrappers Qt provides for them.
Chapter 10, Scripting, covers the benefits of scripting in applications. It will teach you how to employ a scripting engine for a game by using JavaScript or Python.
Chapter 11, Introduction to Qt Quick, teaches you how to program resolution-independent fluid user interfaces using a QML declarative engine and Qt Quick scene graph environment.
Chapter 12, Customization in Qt Quick, focuses on how to implement new graphical items in Qt Quick and implement custom event handling.
Chapter 13, Animations in Qt Quick Games, familiarizes you with the ways to perform animations in Qt Quick and give more hints for implementing games in Qt Quick.
Chapter 14, Advanced Visual Effects in Qt Quick, goes through some advanced concepts that will allow you to perform truly unique graphical effects in Qt Quick.
Chapter 15, 3D Graphics with Qt, outlines using Qt's high-level API for 3D graphics and show you how to implement an animated 3D game.
Chapter 16, Miscellaneous and Advanced Concepts, demonstrates the important aspects of Qt programming that didn't make it into the other chapters but may be important for game programming. This chapter is available online at https://www.packtpub.com/sites/default/files/downloads/MiscellaneousandAdvancedConcepts.pdf.
About the reviewers
Julien Déramond is a software developer living in Paris, France. He started his career developing C++ web services until he entered the embedded world via the Orange set-top boxes in 2012.
Specialized in QML, he mainly prototypes and develops user interfaces with designers. Recently, he started contributing to Qt, especially in finding bugs and proposing patches for the QML JS Reformater of Qt Creator. When he is not writing code, he enjoys traveling and drawing.
Simone Angeloni is a software engineer with over 13 years of experience in C++ and a skillset including cross-platform development, embedded systems, multi-threading, user interfaces, network communication, databases, web applications, game development, and visual design.
He is currently a senior software engineer in the R&D dept of Nikon Corporation, and he is developing software/hardware solutions to control robots used in the motion picture industry.
Packt is searching for authors like you
If you're interested in becoming an author for Packt, please visit auth ors.packtpub.com and apply today. We have worked with thousands of developers and tech professionals, just like you, to help them share their insight with the global tech community. You can make a general application, apply for a specific hot topic that we are recruiting an author for, or submit your own idea.
Table of Contents
0.2 To get the most out of this book
0.3 Download the example code files
1.2 The cross-platform programming
1.5 Choosing the right license
2.1.1 Time for action - Installing Qt using an online installer
2.2.2 Setting up compilers, Qt versions, and kits
2.2.3 Time for action - Loading an example project
2.2.5 Time for action - Running the Affine Transformations project
3.1.1 Time for action - Creating a Qt Widgets project
3.1.3 Time for action - Adding widgets to the form
3.2.1 Time for action - Adding a layout to the form
3.3.1 Creating signals and slots
3.3.2 Connecting signals and slots
3.3.4 Signal and slot access specifiers
3.3.5 Time for action - Receiving the button-click signal from the form
3.3.6 Automatic slot connection and its drawbacks
3.3.7 Time for action - Changing the texts on the labels from the code
3.4 Creating a widget for the tic-tac-toe board
3.4.1 Choosing between designer forms and plain C++ classes
3.4.2 Time for action - Creating a game board widget
3.4.3 Automatic deletion of objects
3.4.4 Time for action - Functionality of a tic-tac-toe board
3.4.5 Time for action - Reacting to the game board's signals
3.5 Advanced form editor usage
3.5.1 Time for action - Designing the game configuration dialog
3.5.2 Accelerators and label buddies
3.5.4 Time for action - Public interface of the dialog
3.6.2 Protecting against invalid input
3.6.4 Time for action - Creating a menu and a toolbar
3.6.6 Time for action - Adding icons to the project
3.6.7 Have a go hero - Extending the game
Chpater 4: Custom 2D Graphics with Graphics View
4.1 Graphics View architecture
4.1.1 Time for action - Creating a project with a Graphics View
4.2.1 The item's coordinate system
4.2.2 The scene's coordinate system
4.2.3 The viewport's coordinate system
4.2.4 Origin point of the transformation
4.2.4.2 Have a go hero - Applying multiple transformations
4.2.5 Parent-child relationship between items
4.2.6 Time for action - Using child items
4.2.6.1 Have a go hero - Implementing the custom rectangle as a class
4.2.7 Conversions between coordinate systems
4.3.5 Keyboard focus in graphics scene
4.3.6.1 Time for action - Adding path items to the scene
4.3.8 Ignoring transformations
4.3.8.1 Time for action - Adding text to a custom rectangle
4.3.9 Finding items by position
4.3.10 Showing specific areas of the scene
4.3.11 Saving a scene to an image file
4.3.11.2 Have a go hero - Rendering only specific parts of a scene
4.4.1 Time for action - Creating a sine graph project
4.4.2 Time for action - Creating a graphics item class
4.4.4 Time for action - Implementing the ability to scale the scene
4.4.5 Time for action - Taking the zoom level into account
4.4.6 Time for action - Reacting to an item's selection state
4.4.7 Time for action - Event handling in a custom item
4.4.8 Time for action - Implementing the ability to create and delete elements with mouse
4.4.9 Time for action - Changing the item's size
4.4.10 Have a go hero - Extending the item's functionality
4.5 Widgets inside Graphics View
4.6.1 A binary space partition tree
4.6.2 Caching the item's paint function
4.6.4 OpenGL in the Graphics View
Chpater 5: Animations in Graphics View
5.1 The jumping elephant or how to animate the scene
5.1.2 Time for action - Creating an item for Benjamin
5.1.4 Time for action - Making Benjamin move
5.1.5.1 Time for action - Moving the background
5.1.5.3 Have a go hero - Adding new background layers
5.2.2 Time for action - Adding a jump animation
5.3.1 Time for action - Using animations to move items smoothly
5.3.2 Have a go hero - Letting the item handle Benjamin's jump
5.3.3 Time for action - Keeping multiple animations in sync
5.3.4 Chaining multiple animations
5.4.1 Working with gamepads in Qt
5.4.2 Time for action - Handling gamepad events
5.5.1 Time for action - Making the coins explode
5.6.1 Have a go hero - Extending the game
5.6.2 A third way of animation
6.1.5 The string search and lookup
6.1.7 Converting between numbers and strings
6.1.9 Using arguments in strings
6.1.10.1 Time for action - A simple quiz game
6.1.10.3 Extracting information out of a string
6.1.10.4 Finding all pattern occurrences
6.2.4.2 Unnecessary allocation
6.2.5 Range-based for and Qt foreach macro
6.3.1.1 Traversing directories
6.3.1.2 Reading and writing files
6.3.3.1 Time for action - Serialization of a custom structure
6.3.4.1 Time for action - Implementing an XML parser for player data
6.3.4.4 Have a go hero - An XML serializer for player data
6.3.6.2 Customizing the settings location and format
6.3.7.1 Time for action - The player data JSON serializer
6.3.7.2 Time for action - Implementing a JSON parser
Chapter 0: Preface
As a leading cross-platform toolkit for all significant desktop, mobile, and embedded platforms, Qt is becoming more popular by the day. This book will help you learn the nitty-gritty of Qt and will equip you with the necessary toolsets to build apps and games. This book is designed as a beginner's guide to take programmers new to Qt from the basics, such as objects, core classes, widgets, and new features in version 5.9, to a level where they can create a custom application with the best practices of programming with Qt.
From a brief introduction of how to create an application and prepare a working environment for both desktop and mobile platforms, we will dive deeper into the basics of creating graphical interfaces and Qt's core concepts of data processing and display. As you progress through the chapters, you'll learn to enrich your games by implementing network connectivity and employing scripting. Delve into Qt Quick, OpenGL, and various other tools to add game logic, design animation, add game physics, handle gamepad input, and build astonishing UIs for games. Toward the end of this book, you'll learn to exploit mobile device features, such as sensors and geolocation services, to build engaging user experiences.
0.1 Who this book is for
This book will be interesting and helpful to programmers and application and UI developers who have basic knowledge of C++. Additionally, some parts of Qt allow you to use JavaScript, so basic knowledge of this language will also be helpful. No previous experience with Qt is required. Developers with up to a year of Qt experience will also benefit from the topics covered in this book.
0.2 To get the most out of this book
You don't need to own or install any particular software before starting to work with the book. A common Windows, Linux, or MacOS system should be sufficient. Chapter 2, Installation, contains detailed instructions on how to download and set up everything you'll need.
In this book, you will find several headings that appear frequently:
- The Time for action section contains clear instructions on how to complete a procedure or task.
- The What just happened? section explains the working of the tasks or instructions that you have just completed.
- The Have a go hero sections contain practical challenges that give you ideas to experiment with what you have learned.
- The Pop quiz sections contain short single-choice questions intended to help you test your own understanding. You will find the answers at the end of the book.
While going through the chapters, you will be presented with multiple games and other projects as well as detailed descriptions of how to create them. We advise you to try to create these projects yourself using the instructions we'll give you. If at any point of time you have trouble following the instructions or don't know how to do a certain step, you should take a pick at the example code files to see how it can be done. However, the most important and exciting part of learning is to decide what you want to implement and then find a way to do it, so pay attention to the "Have a go hero" sections or think of your own way to improve each project.
0.3 Download the example code files
You can download the example code files for this book from your account at www.packtpub.com. If you purchased this book elsewhere, you can visit www.packtpub.com/support and register to have the files emailed directly to you.
You can download the code files by following these steps:
- Log in or register at www.packtpub.com.
- Select the SUPPORT tab.
- Click on Code Downloads & Errata.
- Enter the name of the book in the Search box and follow the onscreen instructions.
Once the file is downloaded, please make sure that you unzip or extract the folder using the latest version of:
- WinRAR/7-Zip for Windows
- Zipeg/iZip/UnRarX for Mac
- 7-Zip/PeaZip for Linux
The code bundle for the book is also hosted on GitHub at https://github.com/PacktPublishing/Game-Programming-Using-Qt-5-Beginners-Guide-Second-Edition.
We also have other code bundles from our rich catalog of books and videos available at https://github.com/PacktPublishing/. Check them out!
0.3.1 Conventions used
There are a number of text conventions used throughout this book.
CodeInText: Indicates code words in text, database table names, folder names, filenames, file extensions, pathnames, dummy URLs, user input, and Twitter handles. Here is an example: "This API is centered on QNetworkAccessManager,which handles the complete communication between your game and the Internet."
A block of code is set as follows:
QNetworkRequest request;
request.setUrl(QUrl("http://localhost/version.txt"));
request.setHeader(QNetworkRequest::UserAgentHeader, "MyGame");
m_manager->get(request);
QNetworkRequest request;
request.setUrl(QUrl("http://localhost/version.txt"));
request.setHeader(QNetworkRequest::UserAgentHeader, "MyGame");
m_manager->get(request);
When we wish to draw your attention to a particular part of a code block, the relevant lines or items are set in bold:
void FileDownload::downloadFinished(QNetworkReply *reply) {
const QByteArray content = reply->readAll();
_edit->setPlainText(content);
reply->deleteLater();
}
void FileDownload::downloadFinished(QNetworkReply *reply) {
const QByteArray content = reply->readAll();
_edit->setPlainText(content);
reply->deleteLater();
}
Bold: Indicates a new term, an important word, or words that you see onscreen. For example, words in menus or dialog boxes appear in the text like this. Here is an example: "On the Select Destination Location screen, click on Next to accept the default destination."
Warnings or important notes appear like this.
Tips and tricks appear like this.
0.4 Get in touch
Feedback from our readers is always welcome.
General feedback: Email feedback@packtpub.com and mention the book title in the subject of your message. If you have questions about any aspect of this book, please email us at questions@packtpub.com.
Errata: Although we have taken every care to ensure the accuracy of our content, mistakes do happen. If you have found a mistake in this book, we would be grateful if you would report this to us. Please visit www.packtpub.com/submit-errata, selecting your book, clicking on the Errata Submission Form link, and entering the details.
Piracy: If you come across any illegal copies of our works in any form on the Internet, we would be grateful if you would provide us with the location address or website name. Please contact us at copyright@packtpub.com with a link to the material.
If you are interested in becoming an author: If there is a topic that you have expertise in and you are interested in either writing or contributing to a book, please visit authors.packtpub.com.
0.5 Reviews
Please leave a review. Once you have read and used this book, why not leave a review on the site that you purchased it from? Potential readers can then see and use your unbiased opinion to make purchase decisions, we at Packt can understand what you think about our products, and our authors can see your feedback on their book. Thank you!
For more information about Packt, please visit packtpub.com.
Chapter 1: Introduction to Qt
In this chapter, you will learn what Qt is and how it evolved. We will describe the structure of the Qt framework and the differences between its versions. Finally, you will learn how to decide which Qt licensing scheme is right for your projects.
The main topics covered in this chapter are:
- Qt history
- Supported platforms
- Structure of the Qt framework
- Qt versions
- Qt licenses
1.1 A journey through time
The development of Qt started in 1991 by two Norwegians—Eirik Chambe-Eng and Haavard Nord—who were looking to create a cross-platform GUI programming toolkit. The first commercial client of Trolltech (the company that created the Qt toolkit) was the European Space Agency. The commercial use of Qt helped Trolltech sustain further development. At that time, Qt was available for two platforms—Unix/X11 and Windows—however, developing with Qt for Windows required buying a proprietary license, which was a significant drawback in porting the existing Unix/Qt applications.
A major step forward was the release of Qt Version 3.0 in 2001, which saw the initial support for Mac as well as an option to use Qt for Unix and Mac under a liberal GPL license. Still, Qt for Windows was only available under a paid license. Nevertheless, at that time, Qt had support for all the important players in the market— Windows, Mac, and Unix desktops, with Trolltech's mainstream product and Qt for embedded Linux.
In 2005, Qt 4.0 was released, which was a real breakthrough for a number of reasons. First, the Qt API was completely redesigned, which made it cleaner and more coherent. Unfortunately, at the same time, it made the existing Qt-based code incompatible with 4.0, and many applications needed to be rewritten from scratch or required much effort to be adapted to the new API. It was a difficult decision, but from the time perspective, we can see it was worth it. Difficulties caused by changes in the API were well countered by the fact that Qt for Windows was finally released under GPL. Many optimizations were introduced that made Qt significantly faster. Lastly, Qt, which was a single library until now, was divided into a number of modules. This allowed programmers to only link to the functionality that they used in their applications, reducing the memory footprint and the dependencies of their software.
In 2008, Trolltech was sold to Nokia, which at that time was looking for a software framework to help it expand and replace its Symbian platform in the future. The Qt community became divided; some people were thrilled, others were worried after seeing Qt's development get transferred to Nokia. Either way, new funds were pumped into Qt, speeding up its progress and opening it for mobile platforms—Symbian and then Maemo and MeeGo.
For Nokia, Qt was not considered a product of its own, but rather a tool. Therefore, Nokia decided to introduce Qt to more developers by adding a very liberal Lesser General Public License (LGPL) that allowed the usage of the framework for both open and closed source development.
Bringing Qt to new platforms and less powerful hardware required a new approach to create user interfaces and to make them more lightweight, fluid, and attractive. Nokia engineers working on Qt came up with a new declarative language to develop such interfaces —the Qt Modeling Language (QML) and a Qt runtime for it called Qt Quick.
The latter became the primary focus of the further development of Qt, practically stalling all non-mobile-related work, channeling all efforts to make Qt Quick faster, easier, and more widespread. Qt 4 was already in the market for seven years, and it became obvious that another major version of Qt had to be released. It was decided to bring more engineers to Qt by allowing anyone to contribute to the project. The Qt Project founded by Nokia in 2011 provided an infrastructure for code review and introduced an open governance model, allowing outside developers to participate in decision making.
Nokia did not manage to finish working on Qt 5.0. As a result of an unexpected turnover of Nokia toward different technology in 2011, the Qt division was sold in mid 2012 to the Finnish company Digia that managed to complete the effort and release Qt 5.0, a completely restructured framework, in December of the same year. While Qt 5.0 introduced a lot of new features, it was mostly compatible with Qt 4 and allowed developers to seamlessly migrate to the new major version.
In 2014, Digia formed the Qt Company that is now responsible for Qt development, commercialization, and licensing. All Qt-related web resources scattered across Qt Project and Digia websites were eventually unified at https://www.qt.io/. Qt continues to receive bug fixes, new features, and new platform support. This book is based on Qt 5.9, which was released in 2017.
1.2 The cross-platform programming
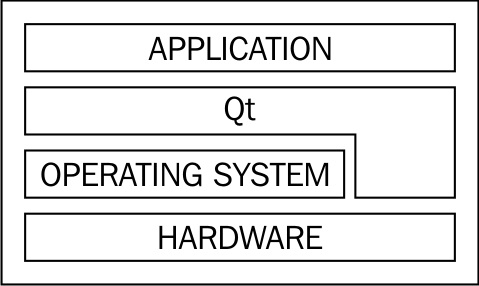
Qt is an application-programming framework that is used to develop cross-platform applications. What this means is that software written for one platform can be ported and executed on another platform with little or no effort. This is obtained by limiting the application source code to a set of calls to routines and libraries available to all the supported platforms, and by delegating all tasks that may differ between platforms (such as drawing on the screen and accessing system data or hardware) to Qt. This effectively creates a layered environment (as shown in the following diagram), where Qt hides all platform-dependent aspects from the application code:
Of course, at times, we need to use some functionality that Qt doesn't provide. In such situations, it is important to use a conditional compilation for platform-specific code. Qt provides a wide set of macros specifying the current platform. We will return to this topic in Chapter 6, Qt Core Essentials.
1.2.1 Supported platforms
The framework is available for a number of platforms, ranging from classical desktop environments through embedded systems to mobile devices. Qt 5.9 supports the following platforms:
- Desktop platforms: Windows, Linux, and macOS
- Mobile platforms: UWP, Android, and iOS
- Embedded platforms: VxWorks, INTEGRITY, QNX, and Embedded Linux
It is likely that the list of supported platforms will change in future Qt versions. You should refer to the Supported Platforms documentation page for your Qt version for detailed information about supported versions of operating systems and compilers.
1.2.2 GUI scalability
For the most part of the history of desktop application development, specifying sizes of GUI elements in pixels was the common practice. While most operating systems had dots per inch (DPI) settings and APIs for taking it into account for a long time, the majority of existing displays had approximately the same DPI, so applications without high DPI support were common.
The situation changed when high-DPI displays became more common in the market—most notably in mobile phones and tablets, but also in laptops and desktops. Now, even if you only target desktop platforms, you should think about supporting different DPI settings. When you target mobile devices, this becomes mandatory.
If you are using Qt Widgets or Qt Quick, you often don't need to specify pixel sizes at all. Standard widgets and controls will use fonts, margins, and offsets defined by the style. If layouts are used, Qt will determine positions and sizes of all GUI items automatically. Avoid specifying constant sizes for GUI elements when possible. You may use sizes related to sizes of other GUI elements, the window, or the screen. Qt also provides an API for querying screen DPI, GUI style metrics, and font metrics, which should help to determine the optimal size for the current device.
On macOS and iOS, Qt Widgets and Qt Quick applications are scaled automatically using a virtual coordinate system. Pixel values in the application remain the same, but the GUI will scale according to the DPI of the current display. For example, if the pixel ratio is set to 2 (a common value for retina displays), creating a widget with 100 "pixels" width will produce a widget with 200 physical pixels. That means that the application doesn't have to be highly aware of DPI variations. However, this scaling does not apply to OpenGL, which always uses physical pixels.
1.3 Qt versions
Each Qt version number (for example, 5.9.2) consists of major, minor, and patch components. Qt pays special attention to forwards and backwards compatibility between different versions. Small changes which are both forwards and backwards compatible (typically bug fixes without changing any API) are indicated by changing only the patch version. New minor versions usually bring in new API and features, so they are not forwards compatible. However, all minor versions are backwards binary and source compatible. This means that if you're transitioning to a newer minor version (for example, from 5.8 to 5.9), you should always be able to rebuild your project without changes. You can even transition to a new minor version without rebuilding, by only updating shared Qt libraries (or letting the package manager of the OS do that). Major releases indicate big changes and may break backwards compatibility. However, the latest major release (5.0) was mostly source compatible with the previous version.
Qt declares Long Term Support (LTS) for certain versions. LTS versions receive patch-level releases with bug fixes and security fixes for three years. Commercial support is available for even longer periods. Current LTS releases at the time of writing are 5.6 and 5.9.
1.4 Structure of Qt framework
As Qt expanded over time, its structure evolved. At first, it was just a single library, then a set of libraries. When it became harder to maintain and update for the growing number of platforms that it supported, a decision was made to split the framework into much smaller modules contained in two module groups—Qt Essentials and Qt Add-ons. A major decision relating to the split was that each module could now have its own independent release schedule.
1.4.1 Qt Essentials
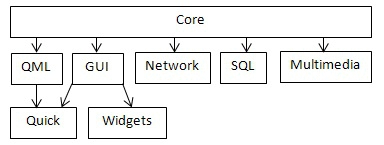
The Essentials group contains modules that are mandatory to implement for every supported platform. This implies that if you are implementing your system using modules from this group only, you can be sure that it can be easily ported to any other platform that Qt supports. The most important relations between Qt Essentials modules are shown in the following diagram:
Some of the modules are explained as follows:
- The Qt Core module contains the most basic Qt functionality that all other modules rely on. It provides support for event processing, meta-objects, data I/O, text processing, and threading. It also brings a number of frameworks, such as the Animation framework, the State Machine framework, and the Plugin framework.
- The Qt GUI module provides basic cross-platform support to build user interfaces. It contains the common functionality required by more high-level GUI modules (Qt Widgets and Qt Quick). Qt GUI contains classes that are used to manipulate windows that can be rendered using either the raster engine or OpenGL. Qt supports desktop OpenGL as well as OpenGL ES 1.1 and 2.0.
- Qt Widgets extends the GUI module with the ability to create a user interface using widgets, such as buttons, edit boxes, labels, data views, dialog boxes, menus, and toolbars, which are arranged using a special layout engine. Qt Widgets utilizes Qt's event system to handle input events in a cross-platform way. This module also contains the implementation of an object-oriented 2D graphics canvas called Graphics View.
- Qt Quick is an extension of Qt GUI, which provides a means to create lightweight fluid user interfaces using QML. It is described in more detail later in this chapter, as well as in Chapter 11, Introduction to Qt Quick.
- Qt QML is an implementation of the QML language used in Qt Quick. It also provides API to integrate custom C++ types into QML's JavaScript engine and to integrate QML code with C++.
- Qt Network brings support for IPv4 and IPv6 networking using TCP and UDP. It also contains HTTP, HTTPS, FTP clients, and it extends support for DNS lookups.
- Qt Multimedia allows programmers to access audio and video hardware (including cameras and FM radio) to record and play multimedia content. It also features 3D positional audio support.
- Qt SQL brings a framework that is used to manipulate SQL databases in an abstract way.
There are also other modules in this group, but we will not focus on them in this book. If you want to learn more about them, you can look them up in the Qt reference manual.
1.4.2 Qt Add-ons
This group contains modules that are optional for any platform. This means that if a particular functionality is not available on some platform or there is nobody willing to spend time working on this functionality for a platform, it will not prevent Qt from supporting this platform. We'll mention some of the most important modules here:
- Qt Concurrent: This handles multi-threaded processing
- Qt 3D: This provides high-level OpenGL building blocks
- Qt Gamepad: This enables applications to support gamepad hardware
- Qt D-Bus: This allows your application to communicate with others via the D-Bus mechanism
- Qt XML Patterns: This helps us to access XML data
Many other modules are also available, but we will not cover them here.
1.4.3 qmake
Some Qt features require additional build steps during the compilation and linking of the project. For example, Meta-Object Compiler (moc), User Interface Compiler (uic), and
Resource Compiler (rcc) may need to be executed to handle Qt's C++ extensions and features. For convenience, Qt provides the qmake executable that manages your Qt project and generates files required for building it on the current platform (such as Makefile for the make utility). qmake reads the project's configuration from a project file with the .pro extension. Qt Creator (the IDE that comes with Qt) automatically creates and updates that file, but it can be edited manually to alter the build process.
Alternatively, CMake can be used to organize and build the project. Qt provides CMake plugins for performing all the necessary build actions. Qt Creator also has fairly good support for CMake projects. CMake is more advanced and powerful than qmake, but it's probably not needed for projects with a simple build process.
1.4.4 Modern C++ standards
You can use modern C++ in your Qt projects. Qt's build tool (qmake) allows you to specify the C++ standard you want to target. Qt itself introduces an improved and extended API by using new C++ features when possible. For example, it uses ref-qualified member functions and introduces methods accepting initializer lists and rvalue references. It also introduces new macros that help you deal with compilers that may or may not support new standards.
If you use a recent C++ revision, you have to pay attention to the compiler versions you use across the target platforms because older compilers may not support the new standard. In this book, we will assume C++11 support, as it is widely available already. Thus, we'll use C++11 features in our code, such as range-based for loops, scoped enumerations, and lambda expressions.
1.5 Choosing the right license
Qt is available under two different licensing schemes—you can choose between a commercial license and an open source one. We will discuss both here to make it easier for you to choose. If you have any doubts regarding whether a particular licensing scheme applies to your use case, you better consult a professional lawyer.
1.5.1 An open source license
The advantage of open source licenses is that we don't have to pay anyone to use Qt; however, the downside is that there are some limitations imposed on how it can be used.
When choosing the open source edition, we have to choose between GPL 3.0 and LGPL 3. Since LGPL is more liberal, in this chapter we will focus on it. Choosing LGPL allows you to use Qt to implement systems that are either open source or closed source—you don't have to reveal the sources of your application to anyone if you don't want to.
However, there are a number of restrictions you need to be aware of:
- Any modifications that you make to Qt itself need to be made public, for example, by distributing source code patches alongside your application binary.
- LGPL requires that users of your application must be able to replace Qt libraries that you provide them with other libraries with the same functionality (for example, a different version of Qt). This usually means that you have to dynamically link your application against Qt so that the user can simply replace Qt libraries with his own. You should be aware that such substitutions can decrease the security of your system; thus, if you need it to be very secure, open source may not be the option for you.
- LGPL is incompatible with a number of licenses, especially proprietary ones, so it is possible that you won't be able to use Qt with some commercial components.
Some Qt modules may have different licensing restrictions. For example, Qt Charts, Qt Data Visualization, and Qt Virtual Keyboard modules are not available under LGPL and can only be used under GPL or the commercial license.
The open source edition of Qt can be downloaded directly from https://www.qt.io.
1.5.2 A commercial license
Most of the restrictions are lifted if you decide to buy a commercial license for Qt. This allows you to keep the entire source code a secret, including any changes you may want to incorporate into Qt. You can freely link your application statically against Qt, which means fewer dependencies, a smaller deployment bundle size, and a faster startup. It also increases the security of your application, as end users cannot inject their own code into the application by replacing a dynamically loaded library with their own.
1.6 Summary
In this chapter, you learned about the architecture of Qt. We saw how it evolved over time and we had a brief overview of what it looks like now. Qt is a complex framework and we will not manage to cover it all, as some parts of its functionality are more important for game programming than others that you can learn on your own in case you ever need them. Now that you know what Qt is, we can proceed with the next chapter, where you will learn how to install Qt on to your development machine.
Chapter 2: Installation
In this chapter, you will learn how to install Qt on your development machine, including Qt Creator, an IDE tailored to use with Qt. You will see how to configure the IDE for your needs and learn the basic skills to use that environment. By the end of this chapter, you will be able to prepare your working environment for both desktop and embedded platforms using the tools included in the Qt release.
The main topics covered in this chapter are as follows:
- Installing Qt and its developer tools
- Main controls of Qt Creator
- Qt documentation
2.1 Installing the Qt SDK
Before you can start using Qt on your machine, it needs to be downloaded and installed. Qt can be installed using dedicated installers that come in two flavors: the online installer, which downloads all the needed components on the fly, and a much larger offline installer, which already contains all the required components. Using an online installer is easier for regular desktop installs, so we prefer this approach.
2.1.1 Time for action - Installing Qt using an online installer
All Qt resources, including the installers, are available at https://qt.io. To obtain the open source version of Qt, go to https://www.qt.io/download-open-source/. The page suggests the online installer for your current operating system by default, as shown in the following screenshot. Click on the Download Now button to download the online installer, or click on View All Downloads to select a different download option:

When the download is complete run the installer, as shown:
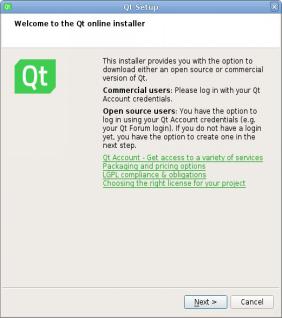
Click on Next to begin the installation process. If you are using a proxy server, click on Settings and adjust your proxy configuration. Then, either log into your Qt Account or click on Skip, if you don't have one.
Click on Next again, and after a while of waiting as the downloader checks remote repositories, you'll be asked for the installation path. Ensure that you choose a path where you have write access and enough free space. It's best to put Qt into your personal directory, unless you ran the installer as the system administrator user. Clicking on Next again will present you with the choice of components that you wish to install, as shown in the following screenshot. You will be given different choices depending on your platform:

Before we continue, you need to choose which Qt version you want to install. We recommend that you use the most recent stable version, that is, the first item under the Qt section. Ignore the Preview section, as it contains prerelease packages that may be unstable. If you want to be fully consistent with the book, you can choose Qt 5.9.0, but it's not required. The installer also allows you to install multiple Qt versions at once.
Expand the section corresponding to the Qt version you want to install, and choose whichever platforms you need. Select at least one desktop platform to be able to build and run desktop applications. When in Windows, you have to make additional choices for the desktop builds. Select the 32-bit or 64-bit version and choose the compiler you want to be working with. If you have a Microsoft C++ compiler (provided with Visual Studio or Visual C++ Build Tools), you can select the build corresponding to the installed MSVC version. If you don't have a Microsoft compiler or you simply don't want to use it, choose the MinGW build and select the corresponding MinGW version in the Tools section of the package tree.
If you want to build Android applications, choose the option corresponding to the desired Android platform. In Windows, you can select a UWP build to create Universal Windows Platform applications.
The installer will always install Qt Creator—the IDE (integrated development environment) optimized for creating Qt applications. You may also select Qt add-ons that you want to use.
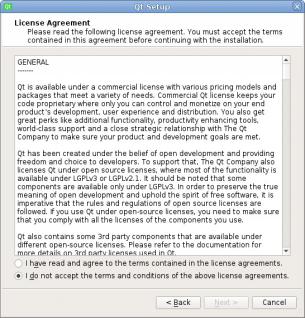
After choosing the required components and clicking on Next again, you will have to accept the licensing terms for Qt by marking an appropriate choice, as shown in the following screenshot:
After you click on Install, the installer will begin downloading and installing the required packages. Once this is done, your Qt installation will be ready. At the end of the process, you will be given an option to launch Qt Creator:

2.1.1.1 What just happened?
The process we went through results in the whole Qt infrastructure appearing on your disk. You can examine the directory you pointed to the installer to see that it created a number of subdirectories in this directory, one for each version of Qt chosen with the installer, and another one called Tools that contains Qt Creator. The Qt directory also contains a MaintenanceTool executable, which allows you to add, remove, and update the installed components. The directory structure ensures that if you ever decide to install another version of Qt, it will not conflict with your existing installation. Furthermore, for each version, you can have a number of platform subdirectories that contain the actual Qt installations for particular platforms.
2.2 Qt Creator
Now that Qt is installed, we will get familiar with Qt Creator and use it to verify the installation.
2.2.1 Qt Creator's modes
After Qt Creator starts, you should be presented with the following screen:
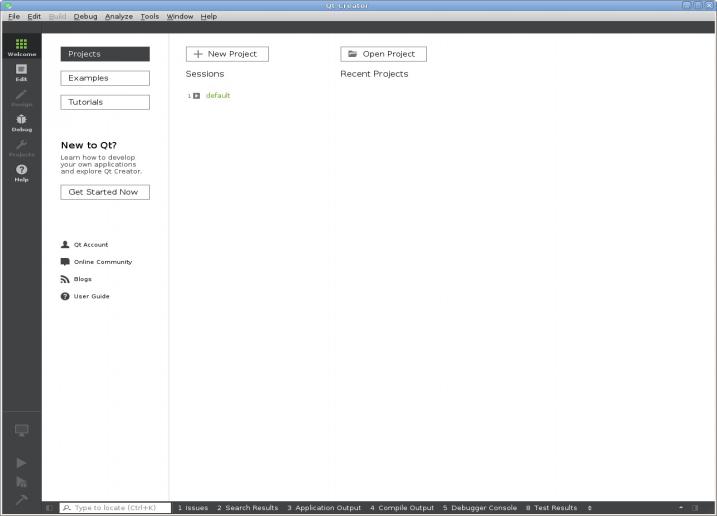
The panel on the left allows you to switch between different modes of the IDE:
- Welcome mode: Allows you to quickly open last sessions, projects, load examples, and tutorials.
- Edit mode: The main mode used to edit the source code of your applications.
- Design mode: Contains a visual form editor. Design mode is automatically activated when you create or open a Qt Widgets form file (.ui) or a QML form file (.ui.qml).
- Debug mode: Automatically activated when you launch the application under debugger. It contains additional views for displaying the call stack, the break point list, and values of local variables. More views (such as thread lists or values of registers) can be enabled when needed.
- Projects mode: Allows you to configure how Qt Creator will build and run your application. For example, you can choose which Qt version it will use or add command-line arguments here.
- Help mode: Provides access to the Qt documentation. We will focus on this topic later in the chapter.
2.2.2 Setting up compilers, Qt versions, and kits
Before Qt Creator can build and run projects, it needs to know which Qt builds, compilers, debuggers, and other tools are available. Fortunately, Qt installer will usually do it automatically, and Qt Creator is able to automatically detect tools that are available system-wide. However, let's verify that our environment is properly configured. From the Tools menu, choose Options. Once a dialog box pops up, choose Build & Run from the side list. This is the place where we can configure the way Qt Creator can build our projects. A complete build configuration is called a kit. It consists of a Qt installation and a compiler that will be executed to perform the build. You can see tabs for all the three entities in the Build & Run section of the Options dialog box.
Let's start with the Compilers tab. If your compiler was not autodetected properly and is not in the list, click on the Add button, choose your compiler type from the list, and fill the name and path to the compiler. If the settings were entered correctly, Creator will autofill all the other details. Then, you can click on Apply to save the changes.
Next, you can switch to the Qt Versions tab. Again, if your Qt installation was not detected automatically, you can click on Add. This will open a file dialog box where you will need to find your Qt installation's directory, where all the binary executables are stored (usually in the bin directory), and select a binary called qmake. Qt Creator will warn you if you choose a wrong file. Otherwise, your Qt installation and version should be detected properly. If you want, you can adjust the version name in the appropriate box.
The last tab to look at is the Kits tab. It allows you to pair a compiler with the Qt version to be used for compilation. In addition to this, for embedded and mobile platforms, you can specify a device to deploy to and a sysroot directory containing all the files needed to build the software for the specified embedded platform. Check that the name of each kit is descriptive enough so that you will be able to select the correct kit (or kits) for each of your applications. If needed, adjust the names of the kits.
2.2.3 Time for action - Loading an example project
Examples are a great way to explore the capabilities of Qt and find the code required for some typical tasks. Each Qt version contains a large set of examples that are always up to date. Qt Creator provides an easy way to load and compile any example project.
Let's try loading one to get familiar with Qt Creator's project editing interface. Then, we will build the project to check whether the installation and configuration were done correctly.
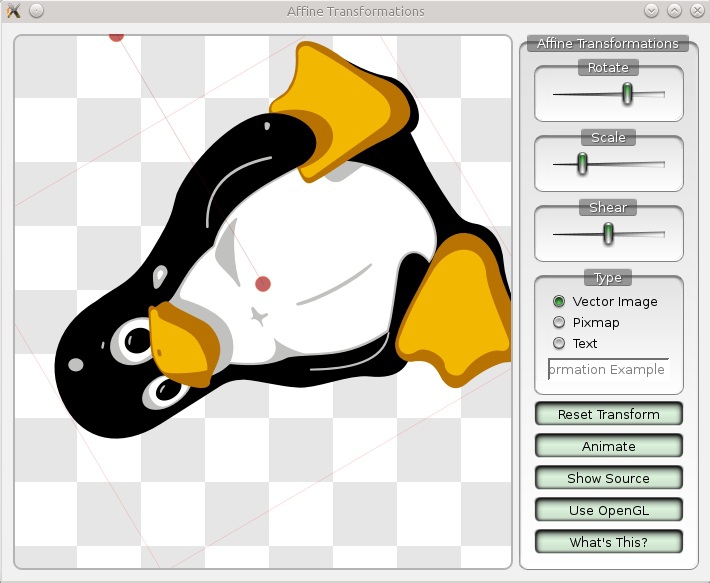
In Qt Creator, click on the Welcome button in the top-left corner of the window to switch to the Welcome mode. Click on the Examples button (refer to the previous screenshot) to open the list of examples with a search box. Ensure that the kit that you want to use is chosen in the drop-down list next to the search box. In the box, enter aff to filter the list of examples and click on Affine Transformations to open the project. If you are asked whether you want to copy the project to a new folder, agree.
After selecting an example, an additional window appears that contains the documentation page of the loaded example. You can close that window when you don't need it. Switch back to the main Qt Creator window.
Qt Creator will display the Configure Project dialog with the list of available kits:
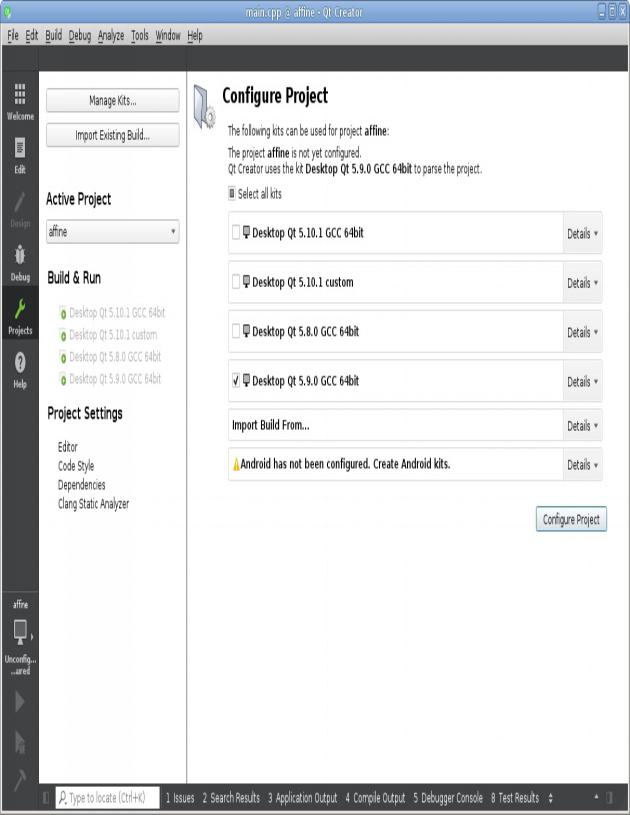
Verify that the kits you want to use are marked with check boxes, and click on the Configure Project button. Qt Creator will then present you with the following window:

This is the Edit mode of Qt Creator. Let's go through the most important parts of this interface:
- Project tree is located at the top-left of the window. It displays all open projects and the hierarchy of files within them. You can double-click on a file to open it for editing. The context menu of projects, directories, and files in the project tree contains a lot of useful functions.
- At the bottom-left of the window, there's a list of open documents. The file selected in this list will appear in the code editor in the center of the window. If the selected file is a Qt Designer form, Qt Creator will automatically switch to the Design mode. Each file in the list has a close button.
- The Type to locate field is present at the left of the bottom panel. If you want to quickly navigate to another file in the project, type the beginning of its name in the field and select it in the pop-up list. Special prefixes can be used to enable other search modes. For example, the c prefix allows you to search for C++ classes. You can press Ctrl + K to activate this field.
- The buttons at the bottom of the left panel allow you to build and run your current project under debugger, or normally. The button above them displays names of the current project and the current build configuration (for example, Debug or Release) and allows you to change them.
- The output panes appear below the code editor when you select them in the bottom panel. The Issues pane contains compiler errors and other related messages. The Search Results pane allows you to run a text search in the entire project and view its results. The Application Output pane displays the text your application has printed to its standard output (stderr or stdout).
Qt Creator is highly configurable, so you can adjust the layout to your liking. For example, it's possible to change the locations of panes, add more panes, and change keyboard shortcuts for every action.
2.2.4 Qt documentation
Qt project has very thorough documentation. For each API item (class, method, and so on), there is a section in the documentation that describes that item and mentions things that you need to know. There are also a lot of overview pages describing modules and their parts. When you are wondering what some Qt class or module is made for or how to use it, the Qt documentation is always a good source of information.
Qt Creator has an integrated documentation viewer. The most commonly used documentation feature is context help. To try it out, open the main.cpp file, set the text cursor inside the QApplication text, and press F1. The help section should appear to the right of the code editor. It displays the documentation page for the QApplication class. The same should work for any other Qt class, method, macro, and so on. You can click on the Open in Help Mode button on top of the help page to switch to the Help mode, where you have more space to view the page.
Another important feature is the search in documentation index. To do that, go to the Help mode by clicking on the Help button on the left panel. In Help mode, in the top-left corner of the window, there is a drop-down list that allows you to select the mode of the left section: Bookmarks, Contents, Index, or Search. Select Index mode, input your request in the Look for: text field and see whether there are any search results in the list below the text field. For example, try typing qt core to search for the Qt Core module overview. If there are results, you can press Enter to quickly open the first result or double-click on any result in the list to open it. If multiple Qt versions are installed, a dialog may appear where you need to select the Qt version you are interested in.
Later in this book, we will sometimes refer to Qt documentation pages by their names. You can use the method described previously to open these pages in Qt Creator.
2.2.5 Time for action - Running the Affine Transformations project
Let's try building and running the project to check whether the building environment is configured properly. To build the project, click on the hammer icon (Build) at the bottom of the left panel. At the right of the bottom panel, a grey progress bar will appear to indicate the build progress. When the build finishes, the progress bar turns green if the build was successful or red otherwise. After the application was built, click on the green triangle icon to run the project.
Qt Creator can automatically save all files and build the project before running it, so you can just hit the Run (Ctrl + R) or Start Debugging (F5) button after making changes to the project. To verify that this feature is enabled, click on Tools and Options in the main menu, go to the Build & Run section, go to the General tab, and check that the Save all files before build, Always build project before deploying it, and Always deploy project before running it options are checked.
If everything works, after some time, the application should be launched, as shown in the next screenshot:
2.2.5.1 What just happened?
How exactly was the project built? To see which kit and which build configuration was used, click on the icon in the action bar directly over the green triangle icon to open the build configuration popup, as shown in the following screenshot:
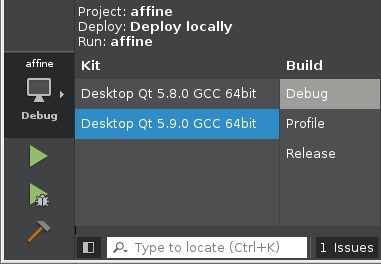
The exact content that you get varies depending on your installation, but in general, on the left, you will see the list of kits configured for the project and on the right, you will see the list of build configurations defined for that kit. You can click on these lists to quickly switch to a different kit or a different build configuration. If your project is configured only for one kit, the list of kits will not appear here.
What if you want to use another kit or change how exactly the project is built? As mentioned earlier, this is done in the Projects mode. If you go to this mode by pressing the Projects button on the left panel, Qt Creator will display the current build configuration, as shown in the following screenshot:

The left part of this window contains a list of all kits. Kits that are not configured to be used with this project are displayed in gray color. You can click on them to enable the kit for the current project. To disable a kit, choose the Disable Kit option in its context menu.
Under each enabled kit, there are two sections of the configuration. The Build section contains settings related to building the project:
- Shadow build is a build mode that places all temporary build files in a separate build directory. This allows you to keep the source directory clean and makes your source files easier to track (especially if you use a version control system). This mode is enabled by default.
- Build directory is the location of temporary build files (only if shadow build is enabled). Each build configuration of the project needs a separate build directory.
- The Build steps section displays commands that will be run to perform the actual building of the project. You can edit command-line arguments of the existing steps and add custom build steps. By default, the build process consists of two steps: qmake (Qt's project management tool described in the previous chapter) reads the project's .pro file and produces a makefile, and then some variation of make tool (depending on the platform) reads the makefile and executes Qt's special compilers, the C++ compiler, and the linker. For more information about qmake, look up the qmake Manual in the documentation index.
- The Build environment section allows you to view and change environment variables that will be available to the build tools.
Most variations of the make tool (including mingw32-make) accept the -j num_cores command-line argument that allows make to spawn multiple compiler processes at the same time. It is highly recommended that you set this argument, as it can drastically reduce compilation time for big projects. To do this, click on Details at the right part of the Make build step and input -j num_cores to the Make arguments field (replace num_cores with the actual number of processor cores on your system). However, MSVC nmake does not support this feature. To fix this issue, Qt provides a replacement tool called jom that supports it.
There can be multiple build configurations for each kit. By default, three configurations are generated: Debug (required for the debugger to work properly), Profile (used for profiling), and Release (the build with more optimizations and no debug information).
The Run section determines how the executable produced by your project will be started. Here, you can change your program's command-line arguments, working directory, and environment variables. You can add multiple run configurations and switch between them using the same button that allows you to choose the current kit and build configuration.
In most cases for desktop and mobile platforms, the binary release of Qt you download from the web page is sufficient for all your needs. However, for embedded systems, especially for ARM-based systems, there is no binary release available, or it is too heavy resource wise for such a lightweight system. Fortunately, Qt is an open source project, so you can always build it from sources. Qt allows you to choose the modules you want to use and has many more configuration options. For more information, look up Building Qt Sources in the documentation index.
2.3 Summary
By now, you should be able to install Qt on your development machine. You can now use Qt Creator to browse the existing examples and learn from them or to read the Qt reference manual to gain additional knowledge. You should have a basic understanding of Qt Creator's main controls. In the next chapter, we will finally start using the framework, and you will learn how to create graphical user interfaces by implementing our very first simple game.
Chpater 3: Qt GUI Programming
This chapter will help you learn how to use Qt to develop applications with a graphical user interface using the Qt Creator IDE. We will get familiar with the core Qt functionality, widgets, layouts, and the signals and slots mechanism that we will later use to create complex systems such as games. We will also cover the various actions and resource systems of Qt. By the end of this chapter, you will be able to write your own programs that communicate with the user through windows and widgets.
The main topics covered in this chapter are as listed:
- Windows and widgets
- Creating a Qt Widgets project and implementing a tic-tac-toe game
- Creating widgets with or without the visual form editor
- Using layouts to automatically position widgets
- Creating and using signals and slots
- Using the Qt resource system
3.1 Creating GUI in Qt
As described in Chapter 1, Introduction to Qt, Qt consists of multiple modules. In this chapter, you will learn how to use the Qt Widgets module. It allows you to create classic desktop applications. The user interface (UI) of these applications consists of widgets.
A widget is a fragment of the UI with a specific look and behavior. Qt provides a lot of built-in widgets that are widely used in applications: labels, text boxes, checkboxes, buttons, and so on. Each of these widgets is represented as an instance of a C++ class derived from QWidget and provides methods for reading and writing the widget's content. You may also create your own widgets with custom content and behavior.
The base class of QWidget is QObject—the most important Qt class that contains multiple useful features. In particular, it implements parent-child relationships between objects, allowing you to organize a collection of objects in your program. Each object can have a parent object and an arbitrary number of children. Making a parent-child relationship between two objects has multiple consequences. When an object is deleted, all its children will be automatically deleted as well. For widgets, there is also a rule that a child occupies an area within the boundaries of its parent. For example, a typical form includes multiple labels, input fields, and buttons. Each of the form's elements is a widget, and the form is their parent widget.
Each widget has a separate coordinate system that is used for painting and event handling within the widget. By default, the origin of this coordinate system is placed in its top-left corner. The child's coordinate system is relative to its parent.
Any widget that is not included into another widget (that is, any top-level widget) becomes a window, and the desktop operating system will provide it with a window frame, which usually usually allows the user to drag around, resize, and close the window (although the presence and content of the window frame can be configured).
3.1.1 Time for action - Creating a Qt Widgets project
The first step to develop an application with Qt Creator is to create a project using one of the templates provided by the IDE.
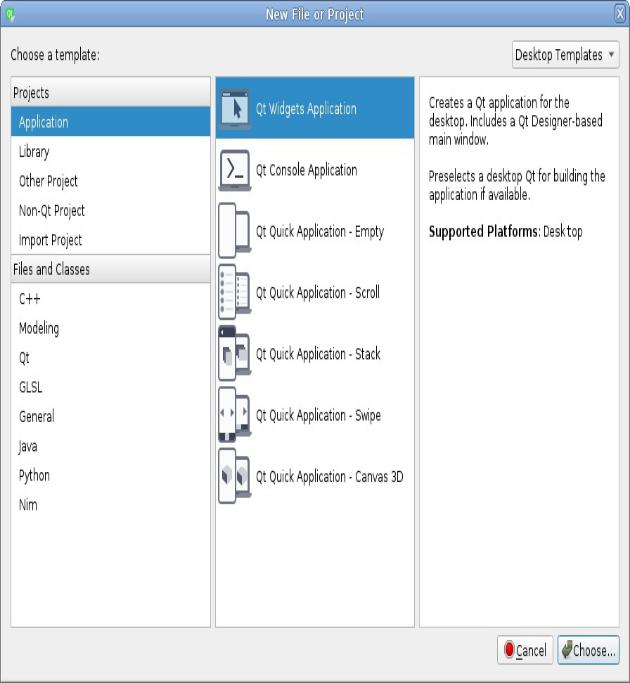
From the File menu of Qt Creator, choose New File or Project. There are a number of project types to choose from. Follow the given steps for creating a Qt Desktop project:
- For a widget-based application, choose the Application group and the Qt Widgets Application template, as shown in the following screenshot:
- The next step is to choose a name and location for your new project:
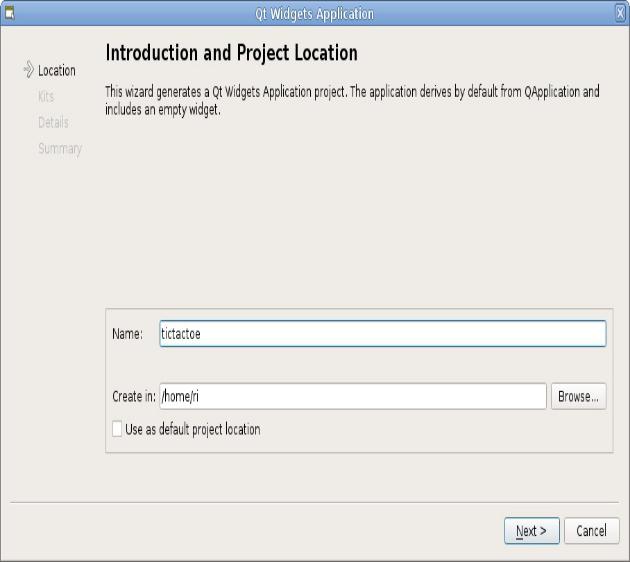
- We will create a simple tic-tac-toe game, so we will name our project tictactoe and provide a nice location for it.
If you have a common directory where you put all your projects, you can tick the Use as default project location checkbox for Qt Creator to remember the location and suggest it the next time you start a new project.
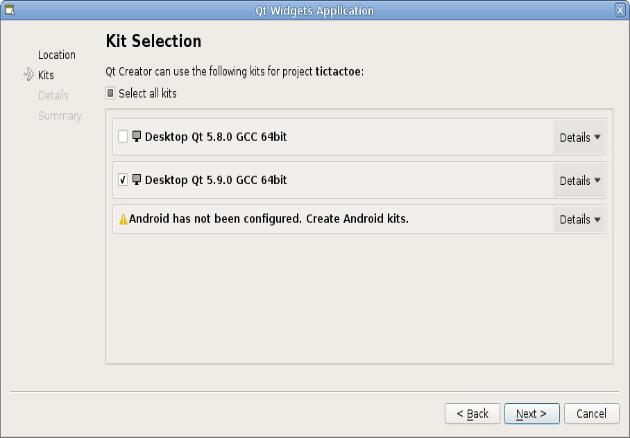
- Next, you need to select the kit (or multiple kits) you want to use with the project. Select the Desktop Qt kit corresponding to the Qt version you want to use:
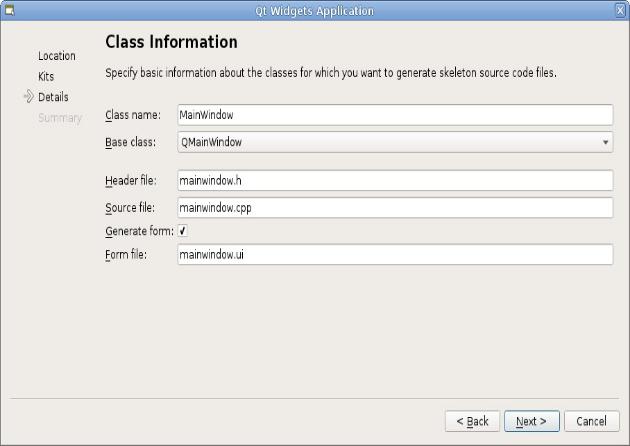
- Now you will be presented with the option of creating the first widget for your project. We want to create a widget that will represent the main window of our application, so we can leave the Class name and Base class fields unchanged. We also want to use the visual form editor to edit the content of the main window, so Generate form should also be left checked:
- Then, click on Next and Finish.
3.1.1.1 What just happened?
Creator created a new subdirectory in the directory that you previously chose for the location of the project. This new directory (the project directory) now contains a number of files. You can use the Projects pane of Qt Creator to list and open these files (refer to Chapter 2, Installation, for an explanation of Qt Creator's basic controls). Let's go through these files.
|
#include "mainwindow.h" #include <QApplication> int main(int argc, char *argv[]) { QApplication a(argc, argv); MainWindow w; w.show(); return a.exec(); }
|
The main.cpp file contains an implementation of the main() function, the entry point of the application, as the following code shows:
The main() function creates an instance of the QApplication class and feeds it with variables containing the command-line arguments. Then, it instantiates our MainWindow class, calls its show method, and finally, returns a value returned by the exec method of the application object.
QApplication is a singleton class that manages the whole application. In particular, it is responsible for processing events that come from within the application or from external sources. For events to be processed, an event loop needs to be running. The loop waits for incoming events and dispatches them to proper routines. Most things in Qt are done through events: input handling, redrawing, receiving data over the network, triggering timers, and so on. This is the reason we say that Qt is an event-oriented framework. Without an active event loop, the event handling would not function properly. The exec() call in QApplication (or, to be more specific, in its base class—QCoreApplication) is responsible for entering the main event loop of the application. The function does not return until your application requests the event loop to be terminated. When that eventually happens, the main function returns and your application ends.
The mainwindow.h and the mainwindow.cpp files implement the MainWindow class. For now, there is almost no code in it. The class is derived from QMainWindow (which, in turn, is derived from QWidget), so it inherits a lot of methods and behavior from its base class. It also contains a Ui::MainWindow *ui field, which is initialized in the constructor and deleted in the destructor. The constructor also calls the ui->setupUi(this); function.
Ui::MainWindow is an automatically generated class, so there is no declaration of it in the source code. It will be created in the build directory when the project is built. The purpose of this class is to set up our widget and fill it with content based on changes in the form editor. The automatically generated class is not a QWidget. In fact, it contains only two methods: setupUi, which performs the initial setup, and retranslateUi, which updates visible text when the UI language is changed. All widgets and other objects added in the form editor are available as public fields of the Ui::MainWindow class, so we can access them from within the MainWindow method as ui->objectName.
mainwindow.ui is a form file that can be edited in the visual form editor. If you open it in Qt Creator by double-clicking on it in the Projects pane, Qt Creator will switch to the Design mode. If you switch back to the Edit mode, you will see that this file is actually an XML file containing the hierarchy and properties of all objects edited in Design mode. During the building of the project, a special tool called the User Interface Compiler converts this XML file to the implementation of the Ui::MainWindow class used in the MainWindow class.
Note that you don't need to edit the XML file by hand or edit any code in the Ui::MainWindow class. Making changes in the visual editor is enough to apply them to your MainWindow class and make the form's objects available to it.
The final file that was generated is called tictactoe.pro and is the project configuration file. It contains all the information that is required to build your project using the tools that Qt provides. Let's analyze this file (less important directives are omitted):
|
QT += core gui greaterThan(QT_MAJOR_VERSION, 4): QT += widgets TARGET = tictactoe TEMPLATE = app SOURCES += main.cpp mainwindow.cpp HEADERS += mainwindow.h FORMS += mainwindow.ui |
The first two lines enable Qt's core, gui, and widgets modules. The TEMPLATE variable is used to specify that your project file describes an application (as opposed to, for example, a library). The TARGET variable contains the name of the produced executable (tictactoe). The last three lines list all files that should be used to build the project.
In fact, qmake enables Qt Core and Qt GUI modules by default, even if you don't specify them explicitly in the project file. You can opt out of using a default module if you want. For example, you can disable Qt GUI by adding QT -= gui to the project file.
Before we proceed, let's tell the build system that we want to use C++11 features (such as lambda expressions, scoped enumerations, and range-based for loops) in our project by adding the following line to tictactoe.pro:
|
CONFIG += c++11
|
If we do this, the C++ compiler will receive a flag indicating that C++11 support should be enabled. This may not be needed if your compiler has C++11 support enabled by default. If you wish to use C++14 instead, use CONFIG += c++14.
What we have now is a complete Qt Widgets project. To build and run it, simply choose the Run entry from the Build drop-down menu or click on the green triangle icon on the left-hand side of the Qt Creator window. After a while, you should see a window pop up. Since we didn't add anything to the window, it is blank:
3.1.2 Design mode interface
Open the mainwindow.ui file and examine Qt Creator's Design mode:
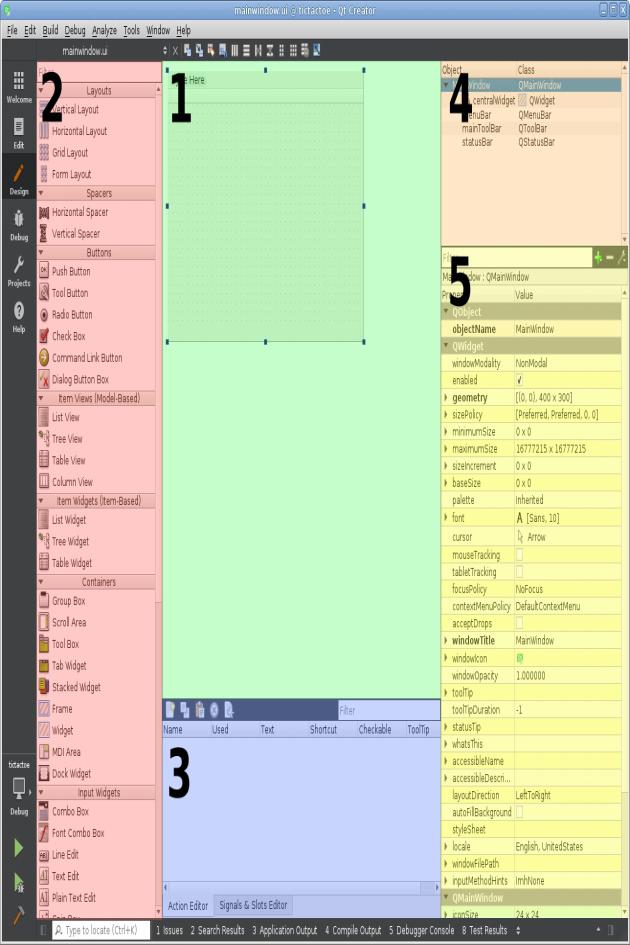
The Design mode consists of five major parts (they are marked on this screenshot):
- The central area (1) is the main worksheet. It contains a graphical representation of the form being designed where you can move widgets around, compose them into layouts, and see how they react. It also allows further manipulation of the form using the point-and-click method that we will learn later.
- The toolbox (2) is located in the left part of the window. It contains a list of available types of widget that are arranged into groups containing items with a related or similar functionality. Over the list, you can see a box that lets you filter widgets that are displayed in the list to show only those that match the entered expression. At the beginning of the list, there are also items that are not really widgets—one group contains layouts, and the other one contains so-called spacers, which are a way to push other items away from each other or create an empty space in layouts. The main purpose of the toolbox is to add items to the form in the worksheet. You can do that by grabbing a widget from the list with the mouse, dragging it to the widget in the central area, and releasing the mouse button.
- The two tabs (3) in the lower part of the window—Action Editor and Signal/Slot Editor—allow us to create helper entities such as actions for the menus and toolbars or signal-slot connections between widgets.
- The object tree (4) is situated in the top-right corner and contains the hierarchy tree of the form's items. The object name and class name of each item added to the form is displayed in the tree. The topmost item corresponds to the form itself. You can use both the central area and the object tree to select the existing items and access their context menu (for example, if you want to delete an item, you can select the Remove... option in the context menu).
- The property editor (5) is located in the bottom-right corner. It allows you to view and change the values of all the properties of the item currently selected in the central area and the object tree. Properties are grouped by their classes that they have been declared in, starting from QObject (the base class implementing properties), which declares only one, but an important, property—objectName. Following QObject, there are properties declared in QWidget, which is a direct descendant of QObject. They are mainly related to the geometry and layout policies of the widget. Further down the list, you can find properties that come from further derivations of QWidget, down to the concrete class of the selected widget. The Filter field above the properties can help you find the needed property quickly.
Taking a closer look at the property editor, you can see that some of them have  arrows, which reveal new rows when clicked. These are composed properties where the complete property value is determined from more than one subproperty value; for example, if there is a property called geometry that defines a rectangle, it can be expanded to show four subproperties: x, y, width, and height. Another thing that you may quickly note is that some property names are displayed in bold. This means that the property value was modified and is different from the default value for this property. This lets you quickly find the properties that you have modified.
If you changed a property's value but decided to stick to the default value later, you should click on the corresponding input field and then click on the
small button with an arrow to its right:  . This is not the same as setting the original value by hand. For example, if you examine the
spacing property of some layouts, it would appear as if it had some constant default value for (example, 6). However, the actual default value depends on the style the application uses and may be different on a different operating system, so the only way to set the default value is to use the dedicated button and ensure that the property is not displayed in bold anymore.
If you prefer a purely alphabetical order where properties are not grouped by their class, you can switch the view using a pop-up menu that becomes available after you click on the wrench icon positioned over the property list; however, once you get familiar with the hierarchy of Qt classes, it will be much easier to navigate the list when it is sorted by class affinity.
What was described here is the basic tool layout. If you don't like it, you can invoke the context menu from the main worksheet, uncheck the Automatically Hide View Title Bars entry, and use the title bars that appear to re-arrange all the panes to your liking, or even close the ones you don't currently need.
Now that you are familiar with the structure of the visual form editor, you can finally add some content to our widget. We are making a tic-tac-toe game with local multiplayer, so we need some way of displaying which of the two players currently moves. Let's put the game board in the center of the window and display the names of the players above and below the board. When a player needs to move, we will make the corresponding name's font bold. We also need a button that will start a new game.
3.1.3 Time for action - Adding widgets to the form
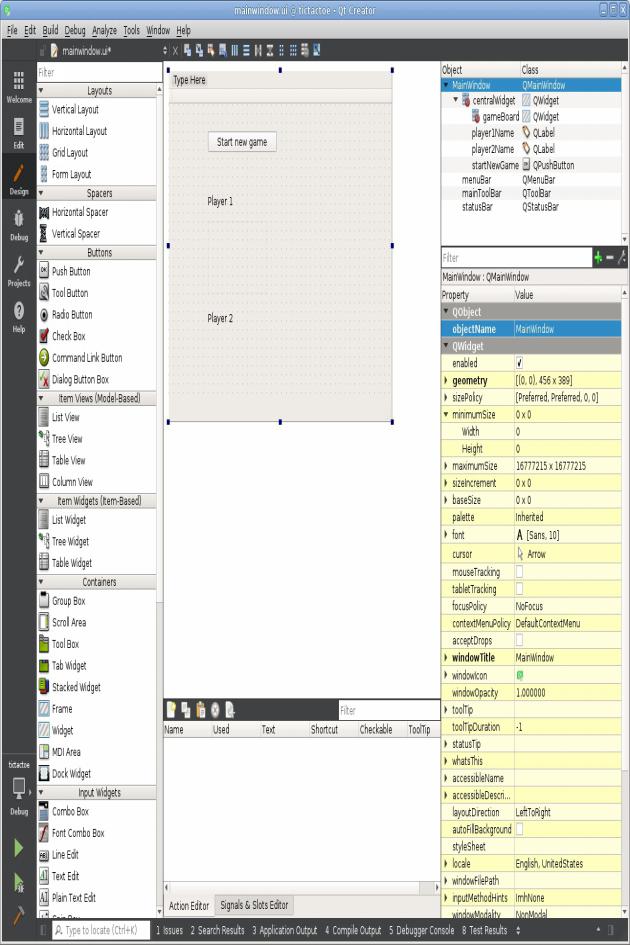
Locate the Label item in the toolbox (it's in the Display Widgets category) and drag it to our form. Use the property editor to set the objectName property of the label to player1Name. objectName is a unique identifier of a form item. The object name is used as the name of the public field in the Ui::MainWindow class, so the label will be available as ui->player1Name in the MainWindow class (and will have a QLabel * type).
Then, locate the text property in the property editor (it will be in the QLabel group, as it is the class that introduces the property) and set it to Player 1. You will see that the text in the central area will be updated accordingly. Add another label, set its objectName to player2Name and its text to Player 2.
You can select a widget in the central area and press the F2 key to edit the text in place. Another way is to double-click on the widget in the form. It works for any widget that can display text.
Drag a Push Button (from the Buttons group) to the form and use the F2 key to rename it to Start new game. If the name does not fit in the button, you can resize it using the blue rectangles on its edges.
Set the objectName of the button to startNewGame.
There is no built-in widget for our game board, so we will need to create a custom widget for it later. For now, we will use an empty widget. Locate Widget in the Containers group of the toolbox and drag it to the form. Set its objectName to gameBoard:
3.2 Layouts
If you build and run the project now, you will see the window with two labels and a button, but they will remain in the exact positions you left them. This is what you almost never want. Usually, it is desired that widgets are automatically resized based on their content and the size of their neighbors. They need to adjust to the changes of the window's size (or, in contrast, the window size may need to be restricted based on possible sizes of the widgets inside of it). This is a very important feature for a cross-platform application, as you cannot assume any particular screen resolution or size of controls. In Qt, all of this requires us to use a special mechanism called layouts.
Layouts allow us to arrange the content of a widget, ensuring that its space is used efficiently. When we set a layout on a widget, we can start adding widgets, and even other layouts, and the mechanism will resize and reposition them according to the rules that we specify. When something happens in the user interface that influences how widgets should be displayed (for example, the label text is replaced with longer text, which makes the label require more space to show its content), the layout is triggered again, which recalculates all positions and sizes and updates widgets, as necessary.
Qt comes with a predefined set of layouts that are derived from the QLayout class, but you can also create your own. The ones that we already have at our disposal are QHBoxLayout and QVBoxLayout, which position items horizontally and vertically; QGridLayout, which arranges items in a grid so that an item can span across columns or rows; and QFormLayout, which creates two columns of items with item descriptions in one column and item content in the other. There is also QStackedLayout, which is rarely used directly and which makes one of the items assigned to it possess all the available space. You can see the most common layouts in action in the following figure:
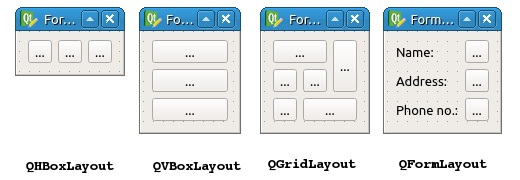
3.2.1 Time for action - Adding a layout to the form
Select the MainWindow top-level item in the object tree and click on  , the Lay Out Vertically icon in the upper toolbar. The button, labels, and the empty widget will be automatically resized to take all the available space of the form in the central area:
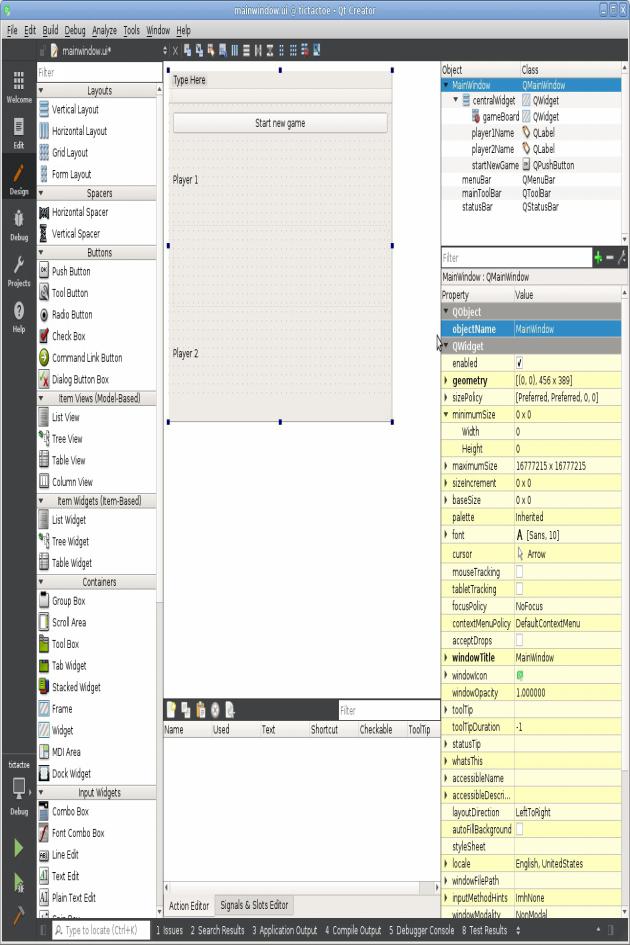
If the items were arranged in a different order, you can drag and drop them to change the order.
Run the application and check that the window's contents are automatically positioned and resized to use all the available space when the window is resized. Unfortunately, the labels take more vertical space than they really require, resulting in an empty space in the application window. We will fix this issue later in this chapter when we learn about size policies.
You can test the layouts of your form without building and running the whole application. Open the Tools menu, go to the Form Editor submenu, and choose the Preview entry. You will see a new window open that looks exactly like the form we just designed. You can resize the window and interact with the objects inside to monitor the behavior of the layouts and widgets. What really happened here is that Qt Creator built a real window for us based on the description that we provided in all the areas of the design mode. Without any compilation, in a blink of an eye, we received a fully working window with all the layouts working and all the properties adjusted to our liking. This is a very important tool, so ensure that you use it often to verify that your layouts are controlling all the widgets as you intended them to—it is much faster than compiling and running the whole application just to check whether the widgets stretch or squeeze properly. You can also resize the form in the central area of the form editor by dragging its bottom-right corner, and if the layouts are set up correctly, the contents should be resized and repositioned.
Now that you can create and display a form, two important operations need to be implemented. First, you need to receive notifications when the user interacts with your form (for example, presses a button) to perform some actions in the code. Second, you need to change the properties of the form's contents programmatically, and fill it with real data (for example, set player names from the code).
3.3 Signals and slots
To trigger functionality as a response to something that happens in an application, Qt uses a mechanism of signals and slots. This is another important feature of the QObject class. It's based on connecting a notification (which Qt calls a signal) about a change of state in some object with a function or method (called a slot) that is executed when such a notification arises. For example, if a button is pressed, it emits (sends) a clicked() signal. If some method is connected to this signal, the method will be called whenever the button is pressed.
Signals can have arguments that serve as a payload. For example, an input box widget (QLineEdit) has a textEdited(const QString &text) signal that's emitted when the user edits the text in the input box. A slot connected to this signal will receive the new text in the input box as its argument (provided it has an argument).
Signals and slots can be used with all classes that inherit QObject (including all widgets). A signal can be connected to a slot, member function, or functor (which includes a regular global function). When an object emits a signal, any of these entities that are connected to that signal will be called. A signal can also be connected to another signal, in which case emitting the first signal will make the other signal be emitted as well. You can connect any number of slots to a single signal and any number of signals to a single slot.
3.3.1 Creating signals and slots
If you create a QObject subclass (or a QWidget subclass, as QWidget inherits QObject), you can mark a method of this class as a signal or a slot. If the parent class had any signals or non-private slots, your class will also inherit them.
In order for signals and slots to work properly, the class declaration must contain the Q_OBJECT macro in a private section of its definition (Qt Creator has generated it for us). When the project is built, a special tool called Meta-Object Compiler (moc) will examine the class's header and generate some extra code necessary for signals and slots to work properly.
Keep in mind that moc and all other Qt build tools do not edit the project files. Your C++ files are passed to the compiler without any changes. All special effects are achieved by generating separate C++ files and adding them to the compilation process.
A signal can be created by declaring a class method in the signals section of the class declaration:
|
signals: void valueChanged(int newValue);
|
However, we don't implement such a method; this will be done automatically by moc. We can send (emit) the signal by calling the method. There is a convention that a signal call should be preceded by the emit macro. This macro has no effect (it's actually a blank macro), but it helps us clarify our intent to emit the signal:
|
void MyClass::setValue(int newValue) { m_value = newValue; emit valueChanged(newValue); }
|
You should only emit signals from within the class methods, as if it were a protected function.
Slots are class methods declared in the private slots, protected slots, or public slots section of the class declaration. Contrary to signals, slots need to be implemented. Qt will call the slot when a signal connected to it is emitted. The visibility of the slot (private, protected, or public) should be chosen using the same principles as for normal methods.
The C++ standard only describes three types of sections of the class definition (private, protected, and public), so you may wonder how these special sections work. They are actually simple macros: the signals
macro expands to public, and slots is a blank macro. So, the compiler treats them as normal methods. These keywords are, however, used by moc to determine how to generate the extra code.
3.3.2 Connecting signals and slots
Signals and slots can be connected and disconnected dynamically using the QObject::connect() and QObject::disconnect() functions. A regular, signal-slot connection is defined by the following four attributes:
- An object that changes its state (sender)
- A signal in the sender object
- An object that contains the function to be called (receiver)
- A slot in the receiver
If you want to make the connection, you need to call the QObject::connect function and pass these four parameters to it. For example, the following code can be used to clear the input box whenever the button is clicked on:
|
connect(button, &QPushButton::clicked, lineEdit, &QLineEdit::clear);
|
Signals and slots in this code are specified using a standard C++ feature called pointers to member functions. Such a pointer contains the name of the class and the name of the method (in our case, signal or slot) in that class. Qt Creator's code autocompletion will help you write connect statements. In particular, if you press Ctrl + Space after connect(button, &, it will insert the name of the class, and if you do that after connect(button, &QPushButton::, it will suggest one of the available signals (in another context, it would suggest all the existing methods of the class).
Note that you can't set the arguments of signals or slots when making a connection. Arguments of the source signal are always determined by the function that emits the signal. Arguments of the receiving slot (or signal) are always the same as the arguments of the source signal, with two exceptions:
- If the receiving slot or signal has fewer arguments than the source signal, the remaining arguments are ignored. For example, if you want to use the valueChanged(int) signal but don't care about the passed value, you can connect this signal to a slot without arguments.
- If the types of the corresponding arguments are not the same, but an implicit conversion between them exists, that conversion is performed. This means that you can, for example, connect a signal carrying a double value with a slot taking an int parameter.
- If the signal and the slot do not have compatible signatures, you will get a compile-time error.
An existing connection is automatically destroyed after the sender or the receiver objects are deleted. Manual disconnection is rarely needed. The connect() function returns a connection handle that can be passed to disconnect(). Alternatively, you can call disconnect() with the same arguments the connect() was called with to undo the connection.
You don't always need to declare a slot to perform a connection. It's possible to connect a signal to a standalone function:
|
connect(button, &QPushButton::clicked, someFunction);
|
The function can also be a lambda expression, in which case it is possible to write the code directly in the connect statement:
|
connect(pushButton, &QPushButton::clicked, []() { qDebug() << "clicked!"; });
|
It can be useful if you want to invoke a slot with a fixed argument value that can't be carried by a signal because it has less arguments. A solution is to invoke the slot from a lambda function (or a standalone function):
|
connect(pushButton, &QPushButton::clicked, [label]() { label->setText("button was clicked"); });
|
A function can even be replaced with a function object (functor). To do this, we create a class, for which we overload the call operator that is compatible with the signal that we wish to connect to, as shown in the following code snippet:
|
class Functor { public: Functor(const QString &name) : m_name(name) {} void operator()(bool toggled) const { qDebug() << m_name << ": button state changed to" << toggled; } private: QString m_name; }; int main(int argc, char *argv[]) { QApplication a(argc, argv); QPushButton *button = new QPushButton(); button->setCheckable(true); QObject::connect(button, &QPushButton::toggled, Functor("my functor")); button->show(); return a.exec(); }
|
This is often a nice way to execute a slot with an additional parameter that is not carried by the signal, as this is much cleaner than using a lambda expression. However, keep in mind that automatic disconnection will not happen when the object referenced in the lambda expression or the functor is deleted. This can lead to a use-after-free bug.
While it is actually possible to connect a signal to a method of a QObject-based class that is not a slot, doing this is not recommended. Declaring the method as a slot shows your intent better. Additionally, methods that are not slots are not available to Qt at runtime, which is required in some cases.
3.3.3 Old connect syntax
Before Qt 5, the old connect syntax was the only option. It looks as follows:
|
connect(spinBox, SIGNAL(valueChanged(int)), dial, SLOT(setValue(int)));
|
This statement establishes a connection between the signal of the spinBox object called valueChanged that carries an int parameter and a setValue slot in the dial object that accepts an int parameter. It is forbidden to put argument names or values in a connect statement. Qt Creator is usually able to suggest all possible inputs in this context if you press Ctrl + Space after SIGNAL( or SLOT(.
While this syntax is still available, we discourage its wide use, because it has the following drawbacks:
- If the signal or the slot is incorrectly referenced (for example, its name or argument types are incorrect) or if argument types of the signals and the slot are not compatible, there will be no compile-time error, only a runtime warning. The new syntax approach performs all the necessary checks at compile time.
- The old syntax doesn't support casting argument values to another type (for example, connect a signal carrying a double value with a slot taking an int parameter).
- The old syntax doesn't support connecting a signal to a standalone function, a lambda expression, or a functor.
The old syntax also uses macros and may look unclear to developers not familiar with Qt. It's hard to say which syntax is easier to read (the old syntax displays argument types, while the new syntax displays the class name instead). However, the new syntax has a big disadvantage when using overloaded signals or slots. The only way to resolve the overloaded function type is to use an explicit cast:
|
connect(spinBox, static_cast<void (QSpinBox::*)(int)>(&QSpinBox::valueChanged), ...);
|
The old connect syntax includes argument types, so it doesn't have this issue. In this case, the old syntax may look more acceptable, but compile-time checks may still be considered more valuable than shorter code. In this book, we prefer the new syntax, but use the old syntax when working with overloaded methods for the sake of clarity.
3.3.4 Signal and slot access specifiers
As mentioned earlier, you should only emit signals from the class that owns it or from its subclasses. However, if signals were really protected or private, you would not be able to connect to them using the pointer-to-member function syntax. To make such connections possible, signals are made public functions. This means that the compiler won't stop you from calling the signal from outside. If you want to prevent such calls, you can declare QPrivateSignal as the last argument of the signal:
|
signals: void valueChanged(int value, QPrivateSignal);
|
QPrivateSignal is a private struct created in each QObject subclass by the Q_OBJECT macro, so you can only create QPrivateSignal objects in the current class.
Slots can be public, protected, or private, depending on how you want to restrict access to them. When using the pointer to a member function syntax for connection, you will only be able to create pointers to slots if you have access to them. It's also correct to call a slot directly from any other location as long as you have access to it.
That being said, Qt doesn't really support restricting access to signals and slots. Regardless of how a signal or a slot is declared, you can always access it using the old connect syntax. You can also call any signal or slot using the QMetaObject::invokeMethod method. While you can restrict direct C++ calls to reduce the possibility of errors, keep in mind that the users of your API still can access any signal or slot if they really want to.
There are some aspects of signals and slots that we have not covered here. We will discuss them later when we deal with multithreading (Online Chapter, https://www.packtpub.com/sites/default/files/downloads/MiscellaneousandAdvancedConcepts.pdf).
3.3.5 Time for action - Receiving the button-click signal from the form
Open the mainwindow.h file and create a private slots section in the class declaration, then declare the startNewGame() private slot, as shown in the following code:
|
class MainWindow : public QMainWindow { Q_OBJECT public: explicit MainWindow(QWidget *parent = nullptr); ~MainWindow(); private slots: void startNewGame(); } |
To quickly implement a freshly declared method, we can ask Qt Creator to create the skeleton code for us by positioning the text cursor at the method declaration, pressing Alt + Enter on the keyboard, and choosing Add definition in tictactoewidget.cpp from the popup.
It also works the other way round. You can write the method body first and then position the cursor on the method signature, press Alt + Enter, and choose Add (...) declaration from the quick-fix menu. There are also various other context-dependent fixes that are available in Creator.
Write the highlighted code in the implementation of this method:
|
void MainWindow::startNewGame() { qDebug() << "button clicked!"; }
|
Add #include <QDebug> to the top section of the mainwindow.cpp file to make the qDebug() macro available.
Finally, add a connect statement to the constructor after the setupUi() call:
|
ui->setupUi(this); connect(ui->startNewGame, &QPushButton::clicked, this, &MainWindow::startNewGame);
|
Run the application and try clicking on the button. The button clicked! text should appear in the Application Output pane in the bottom part of Qt Creator's window (if the pane isn't activated, use the Application Output button in the bottom panel to open it):
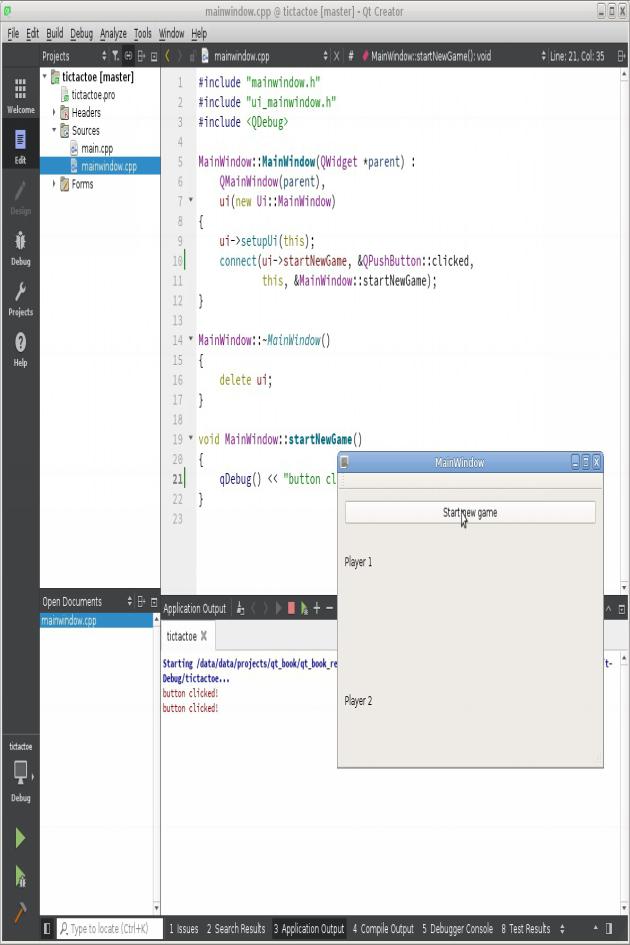
3.3.5.1 What just happened?
We created a new private slot in the MainWindow class and connected the clicked() signal of the Start new game button to the slot. When the user clicks on the button, Qt will call our slot, and the code we wrote inside it gets executed.
Ensure that you put any operations with the form elements after the setupUi() call. This function creates the elements, so ui->startNewGame will simply be uninitialized before setupUi() is called, and attempting to use it will result in undefined behavior.
qDebug() << ... is a convenient way to print debug information to the stderr (standard error output) of the application process. It's quite similar to the std::cerr << ... method available in the standard library, but it separates supplied values with spaces and appends a new line at the end.
Putting debug outputs everywhere quickly becomes inconvenient. Luckily, Qt Creator has powerful integration with C++ debuggers, so you can use Debug mode to check whether some particular line is executing, see the current values of the local variables at that location, and so on. For example, try setting a break point at the line containing qDebug() by clicking on the space to the left of the line number (a red circle indicating the break point should appear). Click on the Start Debugging button (a green triangle with a bug at the bottom-left corner of Qt Creator), wait for the application to launch, and press the Start new game button. When the application enters the break point location, it will pause, and Qt Creator's window will be brought to the front. The yellow arrow over the break point circle will indicate the current step of the execution. You can use the buttons below the code editor to continue execution, stop, or execute the process in steps. Learning to use the debugger becomes very important when developing large applications. We will talk more about using the debugger later (Online Chapter, https://www.packtpub.com/sites/default/files/downloads/MiscellaneousandAdvancedConcepts.pdf).
3.3.6 Automatic slot connection and its drawbacks
Qt also offers an easier way to make a connection between signals of the form's elements and the slots of the class. You can right-click on the button in the central area of the form editor and select the Go to slot... option. You will be prompted to select one of the signals available in the button's class (QPushButton). After you select the clicked() signal, Qt Creator will automatically add a new on_startNewGame_clicked slot to our MainWindow class.
The tricky part is that there is no connect() call that enforces the connection. How is the button's signal connected to this slot, then? The answer is Qt's automatic slot connection feature. When the constructor calls the ui->setupUi(this) function, it creates the widgets and other objects in the form and then calls the QMetaObject::connectSlotsByName method. This method looks at the list of slots existing in the widget class (in our case, MainWindow) and searches for ones that have their name in an on_<object name>_<signal name> pattern, where <object name> is the objectName of an existing child widget and <signal name> is the name of one of this widget's signals. In our case, a button called startNewGame is a child widget of our widget, and it has a clicked signal, so this signal is automatically connected to an on_startNewGame_clicked slot.
While this is a really convenient feature, it has many drawbacks:
- It makes your application harder to maintain. If you rename or remove the form element, you have to update or remove the slot manually. If you forget to do that, the application will only produce a warning at runtime when the automatic connection fails. In a large application, especially when not all forms are instantiated at the start of the application, there is a significant risk that you will miss the warning and the application will not work as intended.
- You have to use a specific name for the slot (for example, on_startNewGame_clicked() instead of a clean-looking startNewGame()).
- Sometimes you want to connect signals from multiple objects to the same slot. Automatic slot connection doesn't provide a way to do this, and creating multiple slots just to call a single function will lead to unnecessary code bloat.
- Automatic slot connection has a runtime cost, because it needs to examine the available children and slots and find the matching ones, but it's usually insignificant since it only runs when the form object is created.
The basic approach shown in the previous section is much more maintainable. Making an explicit connect() call with pointers to member functions will ensure that both signal and slot are specified properly. If you rename or remove the button, it will immediately result in a compilation error that is impossible to miss. You are also free to choose a meaningful name for the slot, so you can make it part of your public API, if desired.
Considering all this, we advise against using the automatic slot connection feature, as the convenience does not outweigh the drawbacks.
3.3.7 Time for action - Changing the texts on the labels from the code
|
void MainWindow::startNewGame() { ui->player1Name->setText(tr("Alice")); ui->player2Name->setText(tr("Bob")); }
|
Now, when you run the application and click on the button, the labels in the form will change. Let's break down this code into pieces:
- As mentioned earlier, the first label's object is accessible in our class as ui->player1Name and has the QLabel * type.
- We're calling the setText method of the QLabel class. This is the setter of the text property of QLabel (the same property that we edited in the property editor of the Design mode). As per Qt's naming convention, getters should have the same name as the property itself, and setters should have a set prefix, followed by the property name. You can set the text cursor on setText and press F1 to learn more about the property and its access functions.
The tr() function (which is short for "translate") is used to translate the text to the current UI language of the application. We will describe the translation infrastructure of Qt in Chapter 6, Qt Core Essentials. By default, this function returns the passed string unchanged, but it's a good habit to wrap any and all string literals that are displayed to the user in this function. Any user-visible text that you enter in the form editor is also subject to translation and is passed through a similar function automatically. Only strings that should not be affected by translation (for example, object names that are used as identifiers) should be created without the tr() function.
3.4 Creating a widget for the tic-tac-toe board
Let's move on to implementing the board. It should contain nine buttons that can display "X" or "O" and allow the players to make their moves. We could add the button directly to the empty widget of our form. However, the behavior of the board is fairly separate from the rest of the form, and it will have quite a bit of logic inside. Following the encapsulation principle, we prefer implementing the board as a separate widget class. Then, we'll replace the empty widget in our main window with the board widget we created.
3.4.1 Choosing between designer forms and plain C++ classes
One way of creating a custom widget is by adding a Designer Form Class to the project. Designer Form Class is a template provided by Qt Creator. It consists of a C++ class that inherits QWidget (directly or indirectly) and a designer form (.ui file), tied together by some automatically generated code. Our MainWindow class also follows this template.
However, if you try to use the visual form editor to create our tic-tac-toe board, you may find it quite inconvenient for this task. One problem is that you need to add nine identical buttons to the form manually. Another issue is accessing these buttons from the code when you need to make a signal connection or change the button's text. The ui->objectName approach is not applicable here because you can only access a concrete widget this way, so you'd have to resort to other means, such as the findChild() method that allows you to search for a child object by its name.
In this case, we prefer to add the buttons in the code, where we can make a loop, set up each button, and put them into an array for easy addressing. The process is pretty similar to how the designer forms operate, but we'll do it by hand. Of course, anything that the form editor can do is accessible through the API.
After you build the project, you can hold Ctrl and click on ui_mainwindow.h at the beginning of mainwindow.cpp to see the code that actually sets up our main window. You should not edit this file, because your changes will not be persistent.
3.4.2 Time for action - Creating a game board widget
Locate the tictactoe folder in the project tree (it's the top-level entry corresponding to our whole project), open its context menu, and select Add New... Select C++ in the left list and C++ Class in the central list. Click on the Choose button, input TicTacToeWidget in the Class name field, and select QWidget in the Base class drop-down list. Click on Next and Finish. Qt Creator will create header and source files for our new class and add them to the project.
Open the tictactoewidget.h file in Creator and update it by adding the highlighted code:
|
#ifndef TICTACTOEWIDGET_H #define TICTACTOEWIDGET_H #include <QWidget> class TicTacToeWidget : public QWidget { Q_OBJECT public: TicTacToeWidget(QWidget *parent = nullptr); ~TicTacToeWidget(); private: QVector<QPushButton*> m_board; }; #endif // TICTACTOEWIDGET_H
|
Our additions create a QVector object (a container similar to std::vector) that can hold pointers to instances of the QPushButton class, which is the most commonly used button class in Qt. We have to include the Qt header containing the QPushButton declaration. Qt Creator can help us do this quickly. Set the text cursor on QPushButton, press Alt + Enter, and select Add #include <QPushButton>. The include directive will appear at the beginning of the file. As you may have noted, each Qt class is declared in the header file that is called exactly the same as the class itself.
From now on, this book will not remind you about adding the include directives to your source code—you will have to take care of this by yourself. This is really easy; just remember that to use a Qt class you need to include a file named after that class.
The next step is to create all the buttons and use a layout to manage their geometries. Switch to the tictactoewidget.cpp file and locate the constructor.
You can use the F4 key to switch between the corresponding header and the source files. You can also use the F2 key to navigate from the definition of a method to its implementation, and back.
First, let's create a layout that will hold our buttons:
|
QGridLayout *gridLayout = new QGridLayout(this);
|
By passing the this pointer to the layout's constructor, we attached the layout to our widget. Then, we can start adding buttons to the layout:
|
for(int row = 0; row < 3; ++row) { for(int column = 0; column < 3; ++column) { QPushButton *button = new QPushButton(" "); gridLayout->addWidget(button, row, column); m_board.append(button); } }
|
The code creates a loop over rows and columns of the board. In each iteration, it creates an instance of the QPushButton class. The content of each button is set to a single space so that it gets the correct initial size. Then, we add the button to the layout in row and column. At the end, we store the pointer to the button in the vector that was declared earlier. This lets us reference any of the buttons later on. They are stored in the vector in such an order that the first three buttons of the first row are stored first, then the buttons from the second row, and finally those from the last row.
This should be enough for testing the widget. Let's add it to our main window. Open the mainwindow.ui file. Invoke the context menu of the empty widget called gameBoard and choose Promote to. This allows us to promote a widget to another class, that is, substitute a widget in the form with an instance of another class.
In our case, we will want to replace the empty widget with our game board. Select QWidget in the Base class name list, because our TicTacToeWidget is inherited from QWidget. Input TicTacToeWidget into the Promoted class name field and verify that the Header file field contains the correct name of the class's header file, as illustrated:
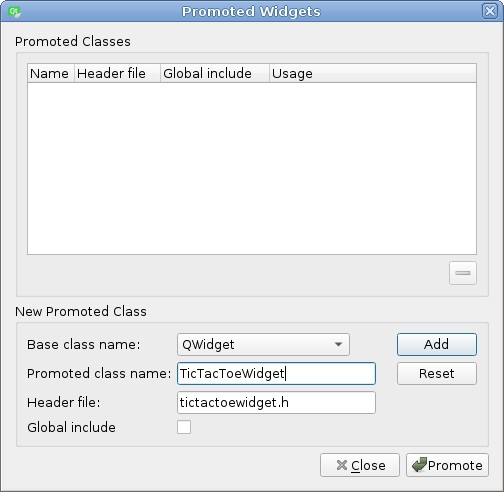
Then, click on the button labeled Add and then Promote, to close the dialog and confirm the promotion. You will not note any changes in the form, because the replacement only takes place at runtime (however, you will see the TicTacToeWidget class name next to gameBoard in the object tree).
Run the application and check whether the game board appears in the main window:
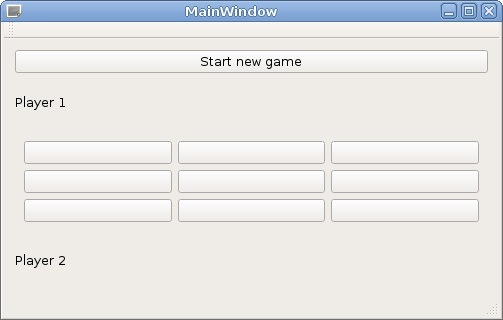
3.4.2.1 What just happened?
Not all widget types are directly available in the form designer. Sometimes, we need to use widget classes that will only be created in the project that is being built. The simplest way to be able to put a custom widget on a form is to ask the designer to replace the class name of a standard widget with a custom name. By promoting an object to a different class, we saved a lot of work trying to otherwise fit our game board into the user interface.
You are now familiar with two ways of creating custom widgets: you can use the form editor or add widgets from the code. Both approaches are valuable. When creating a new widget class in your project, choose the most convenient way depending on your current task.
3.4.3 Automatic deletion of objects
You might have noted that although we created a number of objects in the constructor using the new operator, we didn't destroy those objects anywhere (for example, in the destructor). This is because of the way the memory is managed by Qt. Qt doesn't do any garbage collecting (as C# or Java does), but it has this nice feature related to QObject parent-child hierarchies. The rule is that whenever a QObject instance is destroyed, it also deletes all of its children. This is another reason to set parents to the objects that we create—if we do this, we don't have to care about explicitly freeing any memory.
Since all layouts and widgets inside our top-level widget (an instance of MainWindow class) are its direct or indirect children, they will all be deleted when the main window is destroyed. The MainWindow object is created in the main() function without the new keyword, so it will be deleted at the end of the application after a.exec() returns.
When working with widgets, it's pretty easy to verify that every object has a proper parent. You can assume that anything that is displayed inside the window is a direct or indirect child of that window. However, the parent-child relationship becomes less apparent when working with invisible objects, so you should always check that each object has a proper parent and therefore will be deleted at some point. For example, in our TicTacToeWidget class, the gridLayout object receives its parent through a constructor argument (this). The button objects are initially created without a parent, but the addWidget() function assigns a parent widget to them.
3.4.4 Time for action - Functionality of a tic-tac-toe board
We need to implement a function that will be called upon by clicking on any of the nine buttons on the board. It has to change the text of the button that was clicked on—either "X" or "O"—based on which player made the move. It then has to check whether the move resulted in the game being won by the player (or a draw if no more moves are possible), and if the game ended, it should emit an appropriate signal, informing the environment about the event.
When the user clicks on a button, the clicked() signal is emitted. Connecting this signal to a custom slot lets us implement the mentioned functionality, but since the signal doesn't carry any parameters, how do we tell which button caused the slot to be triggered? We could connect each button to a separate slot, but that's an ugly solution. Fortunately, there are two ways of working around this problem. When a slot is invoked, a pointer to the object that caused the signal to be sent is accessible through a special method in QObject, called sender(). We can use that pointer to find out which of the nine buttons stored in the board list is the one that caused the signal to fire:
|
void TicTacToeWidget::someSlot() { QPushButton *button = static_cast<QPushButton*>(sender()); int buttonIndex = m_board.indexOf(button); // ... }
|
While sender() is a useful call, we should try to avoid it in our own code as it breaks some principles of object-oriented programming. Moreover, there are situations where calling this function is not safe. A better way is to use a dedicated class called QSignalMapper, which lets us achieve a similar result without using sender() directly. Modify the constructor of TicTacToeWidget, as follows:
|
QGridLayout *gridLayout = new QGridLayout(this); QSignalMapper *mapper = new QSignalMapper(this); for(int row = 0; row < 3; ++row) { for(int column = 0; column < 3; ++column) { QPushButton *button = new QPushButton(" "); gridLayout->addWidget(button, row, column); m_board.append(button); mapper->setMapping(button, m_board.count() - 1); connect(button, SIGNAL(clicked()), mapper, SLOT(map())); } } connect(mapper, SIGNAL(mapped(int)), this, SLOT(handleButtonClick(int)));
|
Here, we first created an instance of QSignalMapper and passed a pointer to the board widget as its parent so that the mapper is deleted when the widget is deleted.
Almost all subclasses of QObject can receive a pointer to the parent object in the constructor. In fact, our MainWindow and TicTacToeWidget classes can also do that, thanks to the code Qt Creator generated in their constructors. Following this rule in custom QObject-based classes is recommended. While the parent argument is often optional, it's a good idea to pass it when possible, because objects will be automatically deleted when the parent is deleted. However, there are a few cases where this is redundant, for example, when you add a widget to a layout, the layout will automatically set the parent widget for it.
Then, when we create buttons, we "teach" the mapper that each of the buttons has a number associated with it—the first button will have the number 0, the second one will be bound to the number 1, and so on. By connecting the clicked() signal from the button to the mapper's map() slot, we tell the mapper to process that signal. When the mapper receives the signal from any of the buttons, it will find the mapping of the sender of the signal and emit another signal -mapped()-with the mapped number as its parameter. This allows us to connect to that signal with a new slot (handleButtonClick()) that takes the index of the button in the board list.
Before we create and implement the slot, we need to create a useful enum type and a few helper methods. First, add the following code to the public section of the class declaration in the tictactoewidget.h file:
|
enum class Player { Invalid, Player1, Player2, Draw }; Q_ENUM(Player)
|
This enum lets us specify information about players in the game. The Q_ENUM macro will make Qt recognize the enum (for example, it will allow you to pass the values of this type to qDebug() and also make serialization easier). Generally, it's a good idea to use Q_ENUM for any enum in a QObject-based class.
We can use the Player enum immediately to mark whose move it is now. To do so, add a private field to the class:
|
Player m_currentPlayer;
|
Don't forget to give the new field an initial value in the constructor:
|
m_currentPlayer = Player::Invalid;
|
Then, add the two public methods to manipulate the value of this field:
|
Player currentPlayer() const { return m_currentPlayer; } void setCurrentPlayer(Player p) { if(m_currentPlayer == p) { return; } m_currentPlayer = p; emit currentPlayerChanged(p); }
|
The last method emits a signal, so we have to add the signal declaration to the class definition along with another signal that we will use:
|
signals: void currentPlayerChanged(Player); void gameOver(Player);
|
We only emit the currentPlayerChanged signal when the current player really changes. You always have to pay attention that you don't emit a "changed" signal when you set a value to a field to the same value that it had before the function was called. Users of your classes expect that if a signal is called changed, it is emitted when the value really changes. Otherwise, this can lead to an infinite loop in signal emissions if you have two objects that connect their value setters to the other object's changed signal.
Now it is time to implement the slot itself. First, declare it in the header file:
|
private slots: void handleButtonClick(int index);
|
Use Alt + Enter to quickly generate a definition for the new method, as we did earlier.
When any of the buttons is pressed, the handleButtonClick() slot will be called. The index of the button clicked on will be received as the argument. We can now implement the slot in the .cpp file:
|
void TicTacToeWidget::handleButtonClick(int index) { if (m_currentPlayer == Player::Invalid) { return; // game is not started } if(index < 0 || index >= m_board.size()) { return; // out of bounds check } QPushButton *button = m_board[index]; if(button->text() != " ") return; // invalid move button->setText(currentPlayer() == Player::Player1 ? "X" : "O"); Player winner = checkWinCondition(); if(winner == Player::Invalid) { setCurrentPlayer(currentPlayer() == Player::Player1 ? Player::Player2 : Player::Player1); return; } else { emit gameOver(winner); } }
|
Here, we first retrieve a pointer to the button based on its index. Then, we check whether the button contains an empty space—if not, then it's already occupied, so we return from the method so that the player can pick another field in the board. Next, we set the current player's mark on the button. Then, we check whether the player has won the game. If the game didn't end, we switch the current player and return; otherwise, we emit a gameOver() signal, telling our environment who won the game. The checkWinCondition() method returns Player1, Player2, or Draw if the game has ended, and Invalid otherwise. We will not show the implementation of this method here, as it is quite lengthy. Try implementing it on your own, and if you encounter problems, you can see the solution in the code bundle that accompanies this book.
The last thing we need to do in this class is to add another public method for starting a new game. It will clear the board and set the current player:
|
void TicTacToeWidget::initNewGame() { for(QPushButton *button: m_board) { button->setText(" "); } setCurrentPlayer(Player::Player1); }
|
Now we only need to call this method in the MainWindow::startNewGame method:
|
void MainWindow::startNewGame() { ui->player1Name->setText(tr("Alice")); ui->player2Name->setText(tr("Bob")); ui->gameBoard->initNewGame(); } |
Note that ui->gameBoard actually has a TicTacToeWidget * type, and we can call its methods even though the form editor doesn't know anything specific about our custom class. This is the result of the promoting that we did earlier.
It's time to see how all this works together! Run the application, click on the Start new game button, and you should be able to play some tic-tac-toe.
3.4.5 Time for action - Reacting to the game board's signals
While writing a turn-based board game, it is a good idea to always clearly mark whose turn it is now to make a move. We will do this by marking the moving player's name in bold. There is already a signal in the board class that tells us that the current player has changed, which we can react to update the labels.
We need to connect the board's currentPlayerChanged signal to a new slot in the MainWindow class. Let's add appropriate code into the MainWindow constructor:
|
ui->setupUi(this); connect(ui->gameBoard, &TicTacToeWidget::currentPlayerChanged, this, &MainWindow::updateNameLabels);
|
Now, for the slot itself, declare the following methods in the MainWindow class:
|
private: void setLabelBold(QLabel *label, bool isBold); private slots: void updateNameLabels();
|
Now implement them using the following code:
|
void MainWindow::setLabelBold(QLabel *label, bool isBold) { QFont f = label->font(); f.setBold(isBold); label->setFont(f); } void MainWindow::updateNameLabels() { setLabelBold(ui->player1Name, ui->gameBoard->currentPlayer() ==TicTacToeWidget::Player::Player1); setLabelBold(ui->player2Name, ui->gameBoard->currentPlayer() ==TicTacToeWidget::Player::Player2); }
|
3.4.5.1 What just happened?
QWidget (and, by extension, any widget class) has a font property that determines the properties of the font this widget uses. This property has the QFont type. We can't just write label->font()->setBold(isBold);, because font() returns a const reference, so we have to make a copy of the QFont object. That copy has no connection to the label, so we need to call label->setFont(f) to apply our changes. To avoid repetition of this procedure, we created a helper function, called setLabelBold.
The last thing that needs to be done is to handle the situation when the game ends. Connect the gameOver() signal from the board to a new slot in the main window class. Implement the slot as follows:
void MainWindow::handleGameOver(TicTacToeWidget::Player winner) { QString message;
if(winner == TicTacToeWidget::Player::Draw) { message = tr("Game ended with a draw.");
} else {
QString winnerName = winner == TicTacToeWidget::Player::Player1 ? ui->player1Name->text() : ui->player2Name->text();
message = tr("%1 wins").arg(winnerName);
}
QMessageBox::information(this, tr("Info"), message);
}
This code checks who won the game, assembles the message (we will learn more about QString in Chapter 6, Qt Core Essentials), and shows it using a static method QMessageBox::information() that shows a modal dialog containing the message and a button that allows us to close the dialog.
Run the game and check that it now highlights the current player and shows the message when the game ends.
3.5 Advanced form editor usage
Now it's time to give the players a way to input their names. We will do that by adding a game configuration dialog that will appear when starting a new game.
3.5.1 Time for action - Designing the game configuration dialog
First, select Add New... in the context menu of the tictactoe project and choose to create a new Qt Designer Form Class, as shown in the following screenshot:

In the window that appears, choose Dialog with Buttons Bottom:
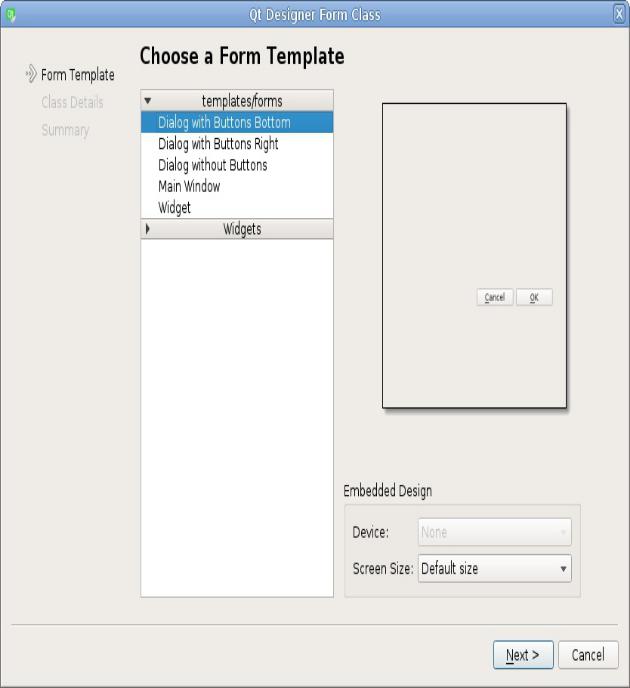
Adjust the class name to ConfigurationDialog, leave the rest of the settings at their default values, and complete the wizard. The files that appear in the project (.cpp, .h, and .ui) are very similar to the files generated for the MainWindow class when we created our project. The only difference is that MainWindow uses QMainWindow as its base class, and ConfigurationDialog uses QDialog. Also, a MainWindow instance is created in the main function, so it shows when the application is started, while we'll need to create a ConfigurationDialog instance somewhere else in the code. QDialog implements behavior that is common for dialogs; in addition to the main content, it displays one or multiple buttons. When the dialog is selected, the user can interact with the dialog and then press one of the buttons. After this, the dialog is usually destroyed. QDialog has a convenient exec() method that doesn't return until the user makes a choice, and then it returns information about the pressed button. We will see that in action after we finish creating the dialog.
Drag and drop two labels and two line edits on the form, position them roughly in a grid, double-click on each of the labels, and adjust their captions to receive a result similar to the following:
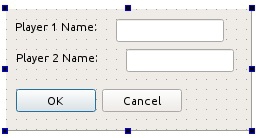
Change the objectName property of the line edits to player1Name and player2Name. Then, click on some empty space in the form and choose the Layout in a grid entry in the upper toolbar. You should see the widgets snap into place—that's because you have just applied a layout to the form. Open the Tools menu, go to the Form Editor submenu, and choose the Preview entry to preview the form.
3.5.2 Accelerators and label buddies
Now, we will focus on giving the dialog some more polish. The first thing we will do is add accelerators to our widgets. These are keyboard shortcuts that, when activated, cause particular widgets to gain keyboard focus or perform a predetermined action (for example, toggle a checkbox or push a button). Accelerators are usually marked by underlining them, as follows:

We will set accelerators to our line edits so that when the user activates an accelerator for the first field, it will gain focus. Through this, we can enter the name of the first player, and, similarly, when the accelerator for the second line edit is triggered, we can start typing in the name for the second player.
Start by selecting the first label on the left-hand side of the first line edit. Press F2 and change the text to Player &A Name:. The & character marks the character directly after it as an accelerator for the widget. Accelerators may not work with digits on some platforms, so we decided to use a letter instead. Similarly, rename the second label to Player &B Name:.
For widgets that are composed of both text and the actual functionality (for example, a button), this is enough to make accelerators work. However, since QLineEdit does not have any text associated with it, we have to use a separate widget for that. This is why we have set the accelerator on the label. Now we need to associate the label with the line edit so that the activation of the label's accelerator will forward it to the widget of our choice. This is done by setting a so-called buddy for the label. You can do this in code using the setBuddy method of the QLabel class or using Creator's form designer. Since we're already in the Design mode, we'll use the latter approach. For that, we need to activate a dedicated mode in the form designer.
Look at the upper part of Creator's window; directly above the form, you will find a toolbar containing a couple of icons. Click on the one labeled Edit buddies  . Now, move the mouse cursor over the label, press the mouse button, and drag from the label toward the line edit. When you drag the label over the line edit, you'll see a graphical visualization of a connection being set between the label and the line edit. If you release the button now, the association will be made permanent. You should note that when such an association is made, the ampersand character (&) vanishes from the label, and the character behind it gets an underscore. Repeat this for the other label and corresponding line edit. Click on the Edit widgets
  button above the form to return the form editor to the default mode. Now, you can preview the form again and check whether accelerators work as expected; pressing Alt + A and Alt + B should set the text cursor to the first and second text field, respectively.
3.5.3 The tab order
While you're previewing the form, you can check another aspect of the UI design. Note which line edit receives the focus when the form is open. There is a chance that the second line edit will be activated first. To check and modify the order of focus, close the preview and switch to the tab order editing mode by clicking on the icon called Edit Tab Order  in the toolbar.
This mode associates a box with a number to each focusable widget. By clicking on the rectangle in the order you wish the widgets to gain focus, you can reorder values, thus re-ordering focus. Now make it so that the order is as shown here:

Our form only has two widgets that can receive focus (except for the dialog's buttons, but their tab order is managed automatically). If you create a form with multiple controls, there is a good chance that when you press the Tab key repeatedly, the focus will start jumping back and forth between buttons and line edits instead of a linear progress from top to bottom (which is an intuitive order for this particular dialog). You can use this mode to correct the tab order.
Enter the preview again and check whether the focus changes according to what you've set.
When deciding about the tab order, it is good to consider which fields in the dialog are mandatory and which are optional. It is a good idea to allow the user to tab through all the mandatory fields first, then to the dialog confirmation button (for example, one that says OK or Accept), and then cycle through all the optional fields. Thanks to this, the user will be able to quickly fill all the mandatory fields and accept the dialog without the need to cycle through all the optional fields that the user wants to leave as their default values.
3.5.4 Time for action - Public interface of the dialog
The next thing to do is to allow to store and read player names from outside the dialog-since the ui component is private, there is no access to it from outside the class code. This is a common situation and one that Qt is also compliant with. Each data field in almost every Qt class is private and may contain accessors (a getter and optionally a setter), which are public methods that allow us to read and store values for data fields. Our dialog has two such fields—the names for the two players.
Names of setter methods in Qt are usually started with set, followed by the name of the property with the first letter converted to uppercase. In our situation, the two setters will be called setPlayer1Name and setPlayer2Name, and they will both accept QString and return void. Declare them in the class header, as shown in the following code snippet:
void setPlayer1Name(const QString &p1name);
void setPlayer2Name(const QString &p2name);
Implement their bodies in the .cpp file:
void ConfigurationDialog::setPlayer1Name(const QString &p1name)
{
ui->player1Name->setText(p1name);
}
void ConfigurationDialog::setPlayer2Name(const QString &p2name)
{
ui->player2Name->setText(p2name);
}
Getter methods in Qt are usually called the same as the property that they are related to-player1Name and player2Name. Put the following code in the header file:
QString player1Name() const;
QString player2Name() const;
Put the following code in the implementation file:
QString ConfigurationDialog::player1Name() const
{
return ui->player1Name->text();
}
QString ConfigurationDialog::player2Name() const
{
return ui->player2Name->text();
}
Our dialog is now ready. Let's use it in the MainWindow::startNewGame function to request player names before starting the game:
ConfigurationDialog dialog(this); if(dialog.exec() == QDialog::Rejected) {
return; // do nothing if dialog rejected
}
ui->player1Name->setText(dialog.player1Name()); ui->player2Name->setText(dialog.player2Name()); ui->gameBoard->initNewGame();
In this slot, we create the settings dialog and show it to the user, forcing them to enter player names. The exec() function doesn't return until the dialog is accepted or cancelled. If the dialog was canceled, we abandon the creation of a new game. Otherwise, we ask the dialog for player names and set them on appropriate labels. Finally, we initialize the board so that users can play the game. The dialog object was created without the new keyword, so it will be deleted immediately after this.
Now you can run the application and see how the configuration dialog works.
3.6 Polishing the application
We have implemented all the important functionalities of our game, and now we will start improving it by exploring other Qt features.
3.6.1 Size policies
If you change the height of the main window of our game, you will note that different widgets are resized in a different way. In particular, buttons retain their original height, and labels gain empty fields to the top and bottom of the text:
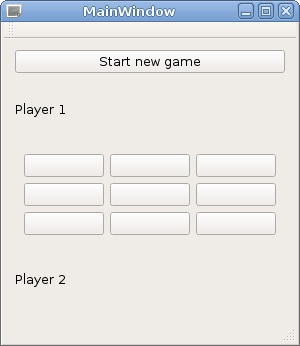
This is because each widget has a property called sizePolicy, which decides how a widget is to be resized by a layout. You can set separate size policies for horizontal and vertical directions. A button has a vertical size policy of Fixed by default, which means that the height of the widget will not change from the default height regardless of how much space there is available. A label has a Preferred size policy by default. The following are the available size policies:
- Ignored: In this, the default size of the widget is ignored and the widget can freely grow and shrink
- Fixed: In this, the default size is the only allowed size of the widget
- Preferred: In this, the default size is the desired size, but both smaller and bigger sizes are acceptable
- Minimum: In this, the default size is the smallest acceptable size for the widget, but the widget can be made larger without hurting its functionality
- Maximum: In this, the default size is the largest size of the widget, and the widget can be shrunk (even to nothing) without hurting its functionality
- Expanding: In this, the default size is the desired size; a smaller size (even zero) is acceptable, but the widget is able to increase its usefulness when more and more space is assigned to it
- MinimumExpanding: This is a combination of Minimum and Expanding-the widget is greedy in terms of space, and it cannot be made smaller than its default size
How do we determine the default size? The answer is by the size returned by the sizeHint virtual method. For layouts, the size is calculated based on the sizes and size policies of their child widgets and nested layouts. For basic widgets, the value returned by sizeHint depends on the content of the widget. In the case of a button, if it holds a line of text and an icon, sizeHint will return the size that is required to fully encompass the text, icon, some space between them, the button frame, and the padding between the frame and content itself.
In our form, we prefer that when the main window is resized, the labels will keep their height, and the game board buttons will grow. To do this, open mainwindow.ui in the form editor, select the first label, and then hold Ctrl and click on the second label. Now both labels are selected, so we can edit their properties at the same time. Locate sizePolicy in the property editor (if you're having trouble locating a property, use the Filter field above the property editor) and expand it by clicking on the triangle to its left. Set Vertical Policy to Fixed. You will see the changes in the form's layout immediately.
The buttons on the game board are created in the code, so navigate to the constructor of TicTacToeWidget class and set the size policy using the following code:
QPushButton *button = new QPushButton(" "); button->setSizePolicy(QSizePolicy::Preferred,
QSizePolicy::Preferred);
This will change both the horizontal and vertical policy of buttons to Preferred. Run the game and observe the changes:
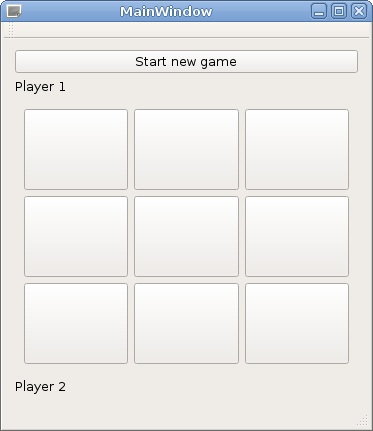
3.6.2 Protecting against invalid input
The configuration dialog did not have any validation until now. Let's make it such that the button to accept the dialog is only enabled when neither of the two line edits is empty (that is, when both the fields contain player names). To do this, we need to connect the textChanged signal of each line edit to a slot that will perform the task.
First, go to the configurationdialog.h file and create a private slot void updateOKButtonState(); in the ConfigurationDialog class (you will need to add the private slots section manually). Use the following code to implement this slot:
void ConfigurationDialog::updateOKButtonState()
{
QPushButton *okButton = ui->buttonBox->button(QDialogButtonBox::Ok); okButton->setEnabled(!ui->player1Name->text().isEmpty() &&
!ui->player2Name->text().isEmpty());
}
This code asks the button box that currently contains the OK and Cancel buttons to give a pointer to the button that accepts the dialog (we have to do that because the buttons are not contained in the form directly, so there are no fields for them in ui). Then, we set the button's enabled property based on whether both player names contain valid values or not.
Next, edit the constructor of the dialog to connect two signals to our new slot. The button state also needs to be updated when we first create the dialog, so add an invocation of updateOKButtonState() to the constructor:
ui->setupUi(this);
connect(ui->player1Name, &QLineEdit::textChanged, this, &ConfigurationDialog::updateOKButtonState);
connect(ui->player2Name, &QLineEdit::textChanged, this, &ConfigurationDialog::updateOKButtonState);
updateOKButtonState();
3.6.3 Main menu and toolbars
As you may remember, any widget that has no parent will be displayed as a window. However, when we created our main window, we selected QMainWindow as the base class. If we had selected QWidget instead, we would still be able to do everything we did up to this point. However, the QMainWindow class provides some unique functionality that we will now use.
A main window represents the control center of an application. It can contain menus, toolbars, docking widgets, a status bar, and the central widget that contains the main content of the window, as shown in the following diagram:

If you open the mainwindow.ui file and take a look at the object tree, you will see the mandatory centralWidget that actually contains our form. There are also optional menuBar, mainToolBar, and statusBar that were added automatically when Qt Creator generated the form.
The central widget part doesn't need any extra explanation; it is a regular widget like any other. We will also not focus on dock widgets or the status bar here. They are useful components, but you can learn about them yourself. Instead, we will spend some time mastering menus and toolbars. You have surely seen and used toolbars and menus in many applications, and you know how important they are for a good user experience.
The main menu has a bit of unusual behavior. It's usually positioned in the top part of the window, but in macOS and some Linux environments, the main menu is separated from the window and displayed in the top area of the screen. Toolbars, on the other hand, can be moved freely by the user and docked horizontally or vertically to the sides of the main window.
The main class shared by both these concepts is QAction, which represents a functionality that can be invoked by a user. A single action can be used in multiple places—it can be an entry in a menu (the QMenu instances) or in a toolbar (QToolBar), a button, or a keyboard shortcut (QShortcut). Manipulating the action (for example, changing its text) causes all its incarnations to update. For example, if you have a Save entry in the menu (with a keyboard shortcut bound to it), a Save icon in the toolbar, and maybe also a Save button somewhere else in your user interface and you want to disallow saving the document (for example, a map in your dungeons and dragons game level editor) because its contents haven't changed since the document was last loaded. In this case, if the menu entry, toolbar icon, and button are all linked to the same QAction instance, then, once you set the enabled property of the action to false, all the three entities will become disabled as well. This is an easy way to keep different parts of your application in sync-if you disable an action object, you can be sure that all entries that trigger the functionality represented by the action are also disabled. Actions can be instantiated in code or created graphically using Action Editor in Qt Creator. An action can have different pieces of data associated with it-a text, tooltip, status bar tip, icons, and others that are less often used. All these are used by incarnations of your actions.
3.6.4 Time for action - Creating a menu and a toolbar
Let's replace our boring Start new game button with a menu entry and a toolbar icon. First, select the button and press the Delete key to delete it. Then, locate Action Editor in the bottom-center part of the form editor and click on the New button on its toolbar. Enter the following values in the dialog (you can fill the Shortcut field by pressing the key combination you want to use):
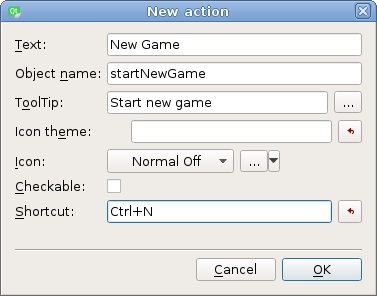
Locate the toolbar in the central area (between the Type Here text and the first label) and drag the line containing the New Game action from the action editor to the toolbar, which results in a button appearing in the toolbar.
To create a menu for the window, double-click on the Type Here text on the top of the form and replace the text with &File (although our application doesn't work with files, we will follow this tradition). Then, drag the New Game action from the action editor over the newly created menu, but do not drop it there yet. The menu should open now, and you can drag the action so that a red bar appears in the submenu in the position where you want the menu entry to appear; now you can release the mouse button to create the entry.
Now we should restore the functionality that was broken when we deleted the button. Navigate to the constructor of the MainWindow class and adjust the connect() call:
connect(ui->startNewGame, &QAction::triggered,
this, &MainWindow::startNewGame);
Actions, like widgets, are accessible through the ui object. The ui->startNewGame object is now a QAction instead of a QPushButton, and we use its triggered() signal to detect whether the action was selected in some way.
Now, if you run the application, you can select the menu entry, press a button on the toolbar, or press the Ctrl + N keys. Either of these operations will cause the action to emit the triggered() signal, and the game configuration dialog should appear.
Like widgets, QAction objects have some useful methods that are accessible in our form class. For example, executing ui->startNewGame->setEnabled(false) will disable all ways to trigger the New Game action.
Let's add another action for quitting the application (although the user can already do it just by closing the main window). Use the action editor to add a new action with text Quit, object name quit, and shortcut Ctrl + Q. Add it to the menu and the toolbar, like the first action.
We can add a new slot that stops the application, but such a slot already exists in QApplication, so let's just reuse it. Locate the constructor of our form in mainwindow.cpp and append the following code:
connect(ui->quit, &QAction::triggered,
qApp, &QApplication::quit);
3.6.4.1 What just happened?
The qApp macro is a shortcut for a function that returns a pointer to the application singleton object, so when the action is triggered, Qt will call the quit() slot on the QApplication object created in main(), which, in turn, will cause the application to end.
3.6.5 The Qt resource system
Buttons in the toolbar usually display icons instead of text. To implement this, we need to add icon files to our project and assign them to the actions we created.
One way of creating icons is by loading images from the filesystem. The problem with this is that you have to install a bunch of files along with your application, and you need to always know where they are located to be able to provide paths to access them. Fortunately, Qt provides a convenient and portable way to embed arbitrary files (such as images for icons) directly in the executable file. This is done by preparing resource files that are later compiled in the binary. Qt Creator provides a graphical tool for this as well.
3.6.6 Time for action - Adding icons to the project
We will add icons to our Start new game and Quit actions. First, use your file manager to create a new subdirectory called icons in the project directory. Place two icon files in the icons directory. You can use icons from the files provided with the book.
Click on Add New... in the context menu of the tictactoe project and select Qt Resource File (located in Qt category). Name it resources, and finish the wizard. Qt Creator will add a new resources.qrc file to the project (it will be displayed under the Resources category in the project tree).
Locate the new resources.qrc file in the project tree of Qt Creator and choose Add Existing Files... in its context menu. Select both icons, and confirm their addition to the resources.
Open the mainwindow.ui form, and double-click on one of the actions in the action editor. Click on the "..." button next to the Icon field, select icons in the left part of the window, and select the appropriate icon in the right part of the window. Once you confirm changes in the dialogs, the corresponding button on the toolbar will switch to displaying the icon instead of the text. The menu entry will also gain the selected icon. Repeat this operation for the second action. Our game should now look like this:

3.6.7 Have a go hero - Extending the game
There are a lot of subtle improvements you can make in the project. For example, you can change the title of the main window (by editing its windowTitle property), add accelerators to the actions, disable the board buttons that do nothing on click, remove the status bar, or use it for displaying the game status.
As an additional exercise, you can try to modify the code we wrote in this chapter to allow playing the game on boards bigger than 3 × 3. Let the user decide the size of the board (you can modify the game options dialog for that and use QSlider and QSpinBox to allow the user to choose the size of the board), and you can then instruct TicTacToeWidget to build the board based on the size it gets. Remember to adjust the game-winning logic! If at any point you run into a dead end and do not know which classes and functions to use, consult the reference manual.
3.7 Pop quiz
Q1. Which classes can have signals?
- All classes derived from QWidget.
- All classes derived from QObject.
- All classes.
Q2. For which of the following do you have to provide your own implementation?
- A signal.
- A slot.
- Both.
Q3. A method that returns the preferred size of a widget is called which of these?
- preferredSize.
- sizeHint.
- defaultSize.
Q4. What is the purpose of the QAction object?
- It represents a functionality that a user can invoke in the program.
- It holds a key sequence to move the focus on a widget.
- It is a base class for all forms generated using the form editor.
3.8 Summary
In this chapter, you learned how to create simple graphical user interfaces with Qt. We went through two approaches: designing the user interface with a graphical tool that generates most of the code for us, and creating user interface classes by writing all the code directly. None of them is better than the other. The form designer allows you to avoid boilerplate code and helps you handle large forms with a lot of controls. On the other hand, the code writing approach gives you more control over the process and allows you to create automatically populated and dynamic interfaces.
We also learned how to use signals and slots in Qt. You should now be able to create simple user interfaces and fill them with logic by connecting signals to slots—predefined ones as well as custom ones that you now know how to define and fill with code.
Qt contains many widget types, but we didn't introduce them to you one by one. There is a really nice explanation of many widget types in the Qt manual called Qt Widget Gallery, which shows most of them in action. If you have any doubts about using any of those widgets, you can check the example code and also look up the appropriate class in the Qt reference manual to learn more about them.
As you already saw, Qt allows you to create custom widget classes, but in this chapter our custom classes mostly reused the default widgets. It's also possible to modify how the widget responds to events and implement custom painting. We will get to this advanced topic in Chapter 8, Custom Widgets. However, if you want to implement a game with custom 2D graphics, there is a simpler alternative—the Graphics View Framework that we'll use in the next chapter.